¶ Samsung Tizen/SSSP signage SoC installation
¶ TEP - Tizen 7 and higher
This section covers the following models:
- QMC
- QBC
- QHC
¶ Ethernet connection
Use the LAN port to connect the display to your network.
¶ How to do a factory reset
If the TV has not been set up before, the TV will power on in the ”Install menu”. The factory reset can then be skipped.
- Display has to be in standby
- On Samsung remote (Factory Menu):
<MUTE><1><8><2><POWER> - Option – Factory Reset – Factory reset. (Select each menu item by pressing Enter/OK button)
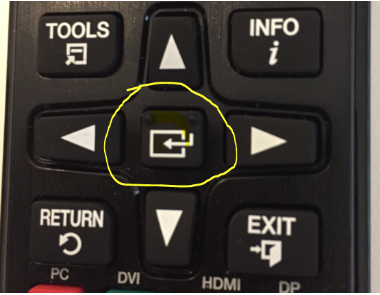
- Display will now power off
- Do a normal installation of the screen
¶ Initial Installation
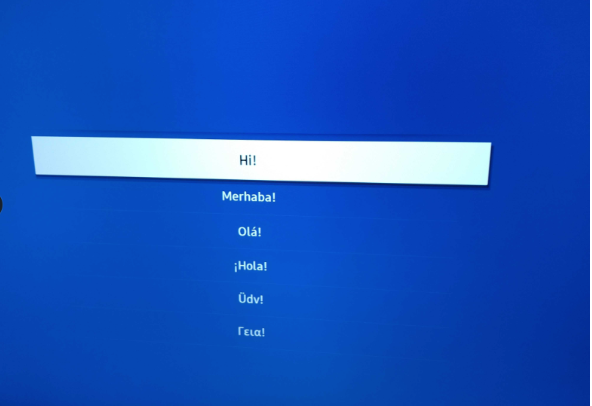
- Power On display
- Welcome: Select language
- Network Settings:
- Wired
- Keep cable plugged in
- Wireless.
- Select SSID
- Enter password
- Wired
- Smart Signage Privacy Notice: OK
- Installation type: Manual setup
- Display Orientation: Landscape
- Auto Power Off: OFF
- PlayerSelection: Custom App
- Enter URL: https://digsig.tv/tep
- Connect to RM server: Skip
- Clock set: Set to current date and time
- Set PIN: It is recomended to skip. The pin will then be 000000
- Setup Completed: Done
- Press Settings on Samsung remote.
- Follow the General Settings described below
¶ General settings
Depending on the remote used, the "settings" button may be displayed as "menu".
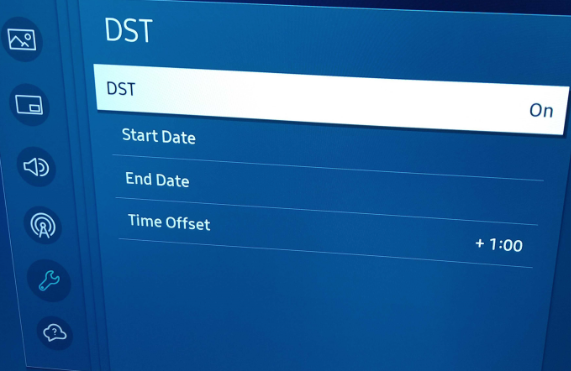
Daylight Saving Time
Settings -> System -> Time -> DST
- Set DST On
- Set start date according to your country’s rules (i.e Norway Last Sunday in March at 02 AM)
- Set end date according to your country’s rules (i.e Norway Last Sunday in October at 03 AM)
- Set correct time offset. (i.e Norway +1h)
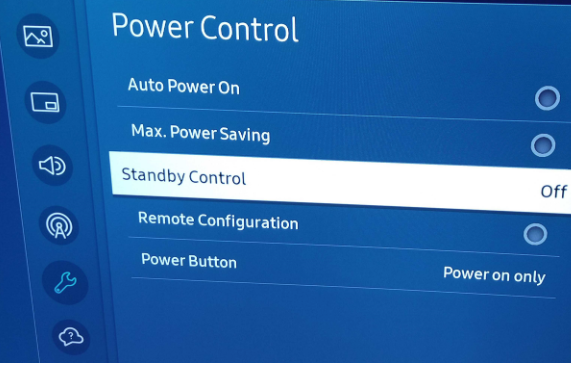
Power Control
Settings -> System -> Power Control -> Max Power Saving: OFF
Eco Solution
Settings -> System -> Power and Energy Saving -> All options set to OFF
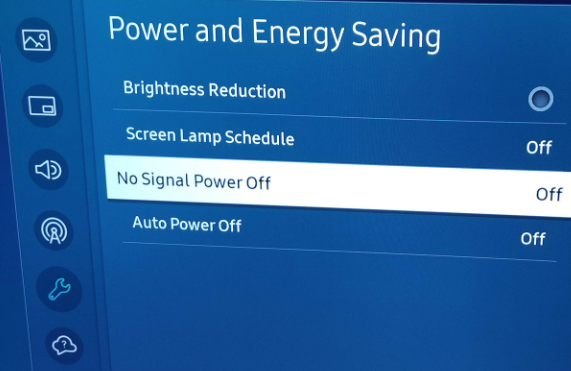
Exit on Remote control to exit Menu
Click Home, select features and select custom app.
¶ Nice to know
¶ Display software version
Enter factory menu: SW-version is displayed on front page, top right.
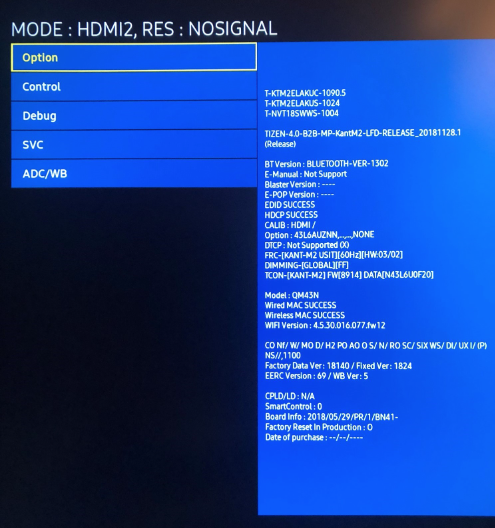
¶ Changing network type
- Select Settings – Network – Open Network Settings
- Select Network Type
- Wired
- Connect
- Wireless
- Select SSID
- Enter Password
- Press Home button
- Select URL launcher
- Wired
¶ Firmware update by USB
- Extract the downloaded zip file.
- Enter your extracted folder and copy this folder to the USB drive (keeping the file structure)
The folder structure is normally like this:
/ (root folder)
|__ firmware version /
|____ image /
|______ info.txt
|______ upgrade.msdUSB must be formatted in FAT32
- Connect the USB drive to the display. From here, use the remote control to navigate to Menu -> Support -> Software Update.
- Run the file.
- As soon as the update has been installed, the display will update itself.
- You can check the current version of your display under Menu -> Support -> Software Update.
¶ Main Micom Firmware update
- Connect the USB to the display
- Select source (PC/HDMI)
- Enter Samsung Support menu: (Settings – Support)
- Select: SW Update – Update now
- Updating Software…
- When ready display will restart
¶ Sub Micom Firmware update
No USB or FW needed.
- Set source to PC
- Display has to be in standby
- On Samsung remote (Factory Menu):
<Mute><1><8><2><POWER> - SVC – Upgrade – SUBMICOM UPGRADE: Ready
- When upgrading comes then wait
- Please do not press power key when sub-micom upgrade
¶ SSSP10 - Tizen 6.5
This section covers the following models:
- QMB
- QHB
- QBB
¶ Ethernet connection
Use the LAN port to connect the display to your network.
¶ How to do a factory reset
If the TV has not been set up before, the TV will power on in the ”Install menu”, shown below. The factory reset can then be skipped.
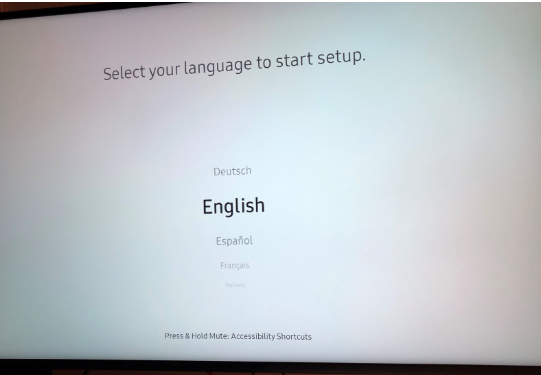
- Set source to PC
- Display has to be in standby
- On Samsung remote (Factory Menu):
<MUTE><1><8><2><POWER> - Option – Factory Reset – Factory reset. (Select each menu item by pressing Enter/OK button)

- Display will now power off
- Do a normal installation of the screen
¶ Initial Installation

- Power On display
- Welcome: Select language
- Network Settings:
- Wired
- Keep cable plugged in
- Wireless.
- Select SSID
- Enter password
- Wired
- Installation type: Basic setup
- Display Orientation: Landscape
- Auto Power Off: OFF
- Play via: Custom Application
- Enter URL: https://digsig.tv
- Connect to RM server: Skip
- Clock set: Set to current date and time
- Setup Completed: Done
- Press Menu on Samsung remote.
- Follow the General Settings described below
¶ General settings
Daylight Saving Time
Menu -> System -> Time -> DST
- Set DST On
- Set start date according to your country’s rules (i.e Norway Last Sunday in March at 02 AM)
- Set end date according to your country’s rules (i.e Norway Last Sunday in October at 03 AM)
- Set correct time offset. (i.e Norway +1h)

Power Control
Menu -> System -> Power Control -> Max Power Saving: OFF

Eco Solution
Menu -> System -> Power and Energy Saving -> All options set to OFF

Exit on Remote control to exit Menu
Click Source and select URL launcher
¶ Nice to know
¶ Display software version
Enter factory menu: SW-version is displayed on front page, top right.

¶ Changing network type
- Select Menu – Network – Open Network Settings
- Select Network Type
- Wired
- Connect
- Wireless
- Select SSID
- Enter Password
- Press Home button
- Select URL launcher
- Wired
¶ Firmware update by USB
¶ Main Micom Firmware update
- Connect the USB to the display
- Select source (PC/HDMI)
- Enter Samsung Support menu: (Home – Support)
- Select: SW Update – Update now
- Updating Software…
- When ready display will restart
¶ Sub Micom Firmware update
No USB or FW needed.
- Set source to PC
- Display has to be in standby
- On Samsung remote (Factory Menu):
<Mute><1><8><2><POWER> - SVC – Upgrade – SUBMICOM UPGRADE: Ready
- When upgrading comes then wait
- Please do not press power key when sub-micom upgrade
¶ SSSP5 & SSSP6 - Tizen
This section covers the following models:
- QMH (SSP5)
- QBH (SSP5)
- DBJ (SSP5)
- QBXXN (SSP6)
- QMXXN (SSP6)
- QMXXR(SSP6)
¶ Ethernet connection
Use the LAN port to connect the display to your network.
¶ How to do a factory reset
If the TV has not been set up before, the TV will power on in the ”Install menu”, shown below. The factory reset can then be skipped.

- Set source to PC
- Display has to be in standby
- On Samsung remote (Factory Menu):
<MUTE><1><8><2><POWER> - Option – Factory Reset – Factory reset. (Select each menu item by pressing Enter/OK button)

- Display will now power off
- Do a normal installation of the screen
¶ Initial Installation

- Power On display
- Welcome: Select language
- Installation type: Basic setup
- Display Orientation: Landscape
- Auto Power Off: OFF
- Network Settings:
- Wired
- Keep cable plugged in
- Wireless.
- Select SSID
- Enter password
- Wired
- Play via: URL Launcher
- Enter URL: https://digsig.tv
- Connect to RM server: Skip
- Clock set: Set to current date and time
- Setup Completed: Done
- Press Menu on Samsung remote.
- Follow the General Settings described below
¶ General settings
Daylight Saving Time
Menu -> System -> Time -> DST
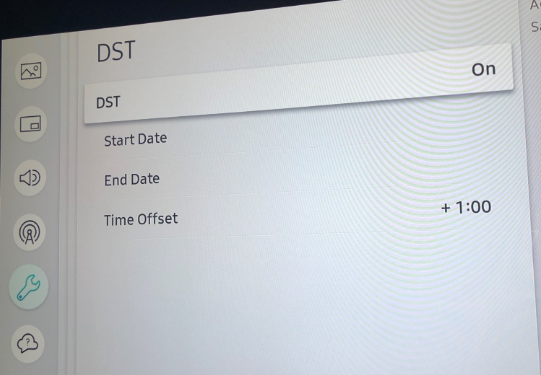
- Set DST On
- Set start date according to your country’s rules (i.e Norway Last Sunday in March at 02 AM)
- Set end date according to your country’s rules (i.e Norway Last Sunday in October at 03 AM)
- Set correct time offset. (i.e Norway +1h)
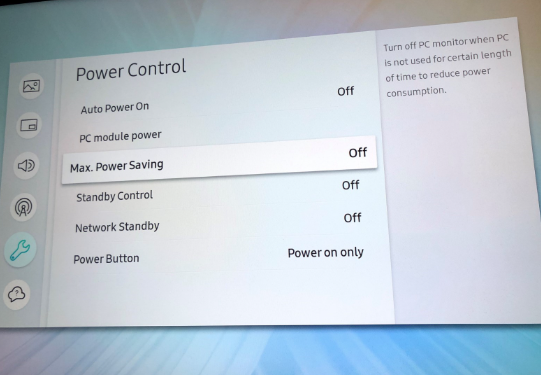
Power Control
Menu -> System -> Power Control -> Max Power Saving: OFF
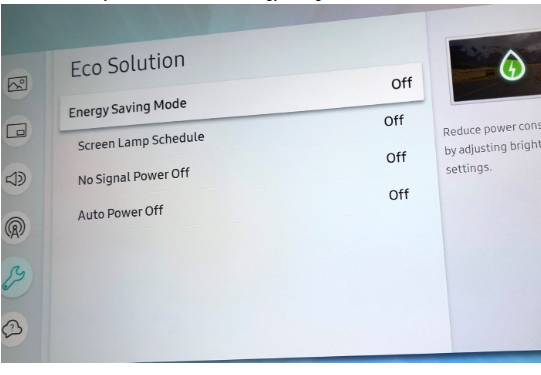
Eco Solution
Menu -> System -> Eco Solution -> Energy Saving Mode: OFF
Exit on Remote control to exit Menu
Click Source and select URL launcher
¶ Nice to know
¶ Display software version
Enter factory menu: SW-version is displayed on front page, top right.

¶ Changing network type
- Select Menu – Network – Open Network Settings
- Select Network Type
- Wired
- Connect
- Wireless
- Select SSID
- Enter Password
- Press Home button
- Select URL launcher
- Wired
¶ Firmware update by USB
¶ Main Micom Firmware update
- Connect the USB to the display
- Select source (PC/HDMI)
- Enter Samsung Support menu: (Home – Support)
- Select: SW Update – Update now
- Updating Software…
- When ready display will restart
¶ Sub Micom Firmware update
No USB or FW needed.
- Set source to PC
- Display has to be in standby
- On Samsung remote (Factory Menu):
<Mute><1><8><2><POWER> - SVC – Upgrade – SUBMICOM UPGRADE: Ready
- When upgrading comes then wait
- Please do not press power key when sub-micom upgrade
¶ SSSP4 - Tizen
This section covers the PMxxE models.
¶ Ethernet connection
Use the LAN port to connect the display to your network.
¶ How to do a factory reset
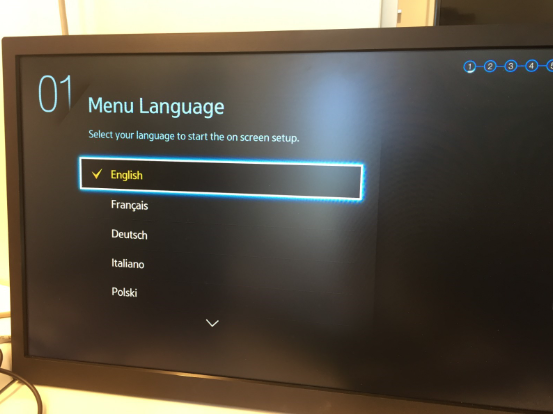
If the TV has not been set up before, the TV will power on in the ”Install menu”, shown below. The factory reset can then be skipped.
- Set source to PC
- Display has to be in standby
- On Samsung remote (Factory Menu):
<MUTE><1><8><2><POWER> - Option – Factory Reset – Factory reset. (Select each menu item by pressing Enter/OK button)

- Display will now power off
- Do a normal installation of the screen
¶ Initial Installation
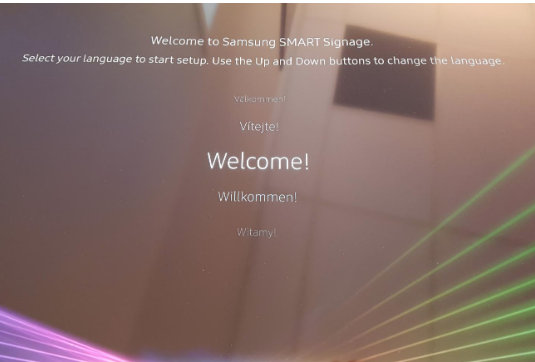
- Power On display
- Welcome: Select language
- Display Orientation: Landscape
- Auto Power Off: OFF
- Network Settings:
- Wired
- Keep cable plugged in
- Wireless
- Select SSID
- Enter password
- Wired
- Play via: URL Launcher
- Enter URL: https://digsig.tv
- Connect to RM Server: Skip
- Set Current Time
- Set Time and Date
- Setup Completed.
- Press Menu on Samsung remote.
- Select System – Time - DST
- Set DST On
- Set start date according to your country’s rules
- Set end date according to your country’s rules
- Set correct time offset.
- Press Source on Samsung remote
- Select URL Launcher to start the URL Launcher
¶ General settings
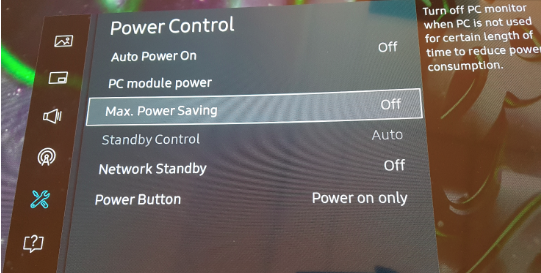
Power Control
Home -> System -> Power Control -> Max Power Saving: OFF
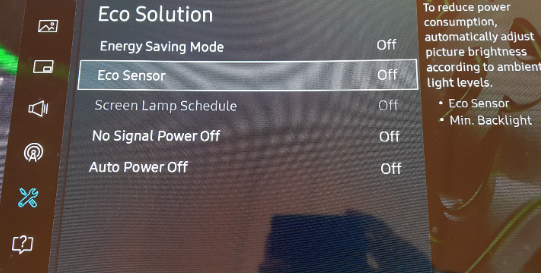
Eco Solution
Home -> System -> Eco Solution -> Eco Sensor: OFF
¶ Nice to know
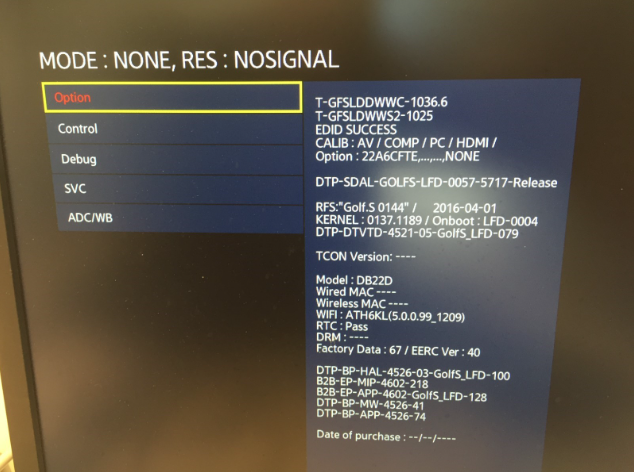
¶ Display software version
Enter factory menu: SW-version is displayed on front page, top right.
¶ Changing network type
- Select Menu – Network – Network Settings
- Select Network Type
- Wired
- Connect
- Wireless
- Select SSID
- Enter Password
- Wired
- Press Home button.
- Select URL lancher.
¶ Setting Time and Daylight Saving Time
- Select Menu – System -Time
- Select Clock Set and set correct time and date.
- Select DST
- Set DST On
- Set start and end date, and correct offset.
¶ Firmware update by USB
¶ Main Micom Firmware update
- Connect the USB to the display
- Select source (PC/HDMI)
- Enter Samsung Support menu: (Home – Support)
- Select: SW Update – Update now
- Updating Software…
- When ready display will restart
¶ Sub Micom Firmware update
No USB or FW needed.
- Set source to PC
- Display has to be in standby
- On Samsung remote (Factory Menu):
<Mute><1><8><2><POWER> - SVC – Upgrade – SUBMICOM UPGRADE: Ready
- When upgrading comes then wait
- Please do not press power key when sub-micom upgrade
¶ SSSP2 & SSSP3
This section covers the following models DBxxD (SSSP2) and DBxxE (SSSP3):.
¶ Ethernet connection
Use the LAN port to connect the display to your network.
¶ How to do a factory reset
If the display has not been set up before, the display will power on in the ”Install menu”, shown below. The factory reset can then be skipped.

- Display has to be in standby
- On Samsung remote (Factory Menu):
<MUTE><1><8><2><POWER> - Option – Factory Reset – Factory reset. (Select each menu item by pressing Enter/OK button)

- Display will now power off
- Do a normal installation of the screen
¶ Initial Installation
- Power On display
- Menu Language: Your language
- Display Orientation: Landscape
- Auto Power Off: OFF
- Network Settings:
- Wired
- Keep cable plugged in
- Wireless
- Select SSID
- Enter password
- Wired
- Clock Set
- Set Time and Date
- Play via: URL Launcher
- Enter URL: http://sssp.digsig.tv
- Setup Completed.
- Press Menu on Samsung remote
- Select System – Time – DST
- Set DST On
- Set start date according to your country’s rules
- Set end date according to your country’s rules
- Set correct time offset.
- Exit Menu
- Start URL Launcher.
¶ Nice to know
¶ Display software version
Enter factory menu: SW-version is displayed on front page, top right.

¶ Changing network type
- Select Menu – Network – Network Settings
- Select Network Type
- Wired
- Connect
- Wireless
- Select SSID
- Enter Password
- Wired
- Press Home button.
- Select URL lancher.
¶ Setting Time and Daylight Saving Time
- Select Menu – System -Time
- Select Clock Set and set correct time and date.
- Select DST
- Set DST On
- Set start and end date, and correct offset.
¶ Firmware update by USB
¶ Main Micom Firmware update
- Connect the USB to the display
- Select source (PC/HDMI)
- Enter Samsung Support menu: (Home – Support)
- Select: SW Update – Update now
- Updating Software…
- When ready display will restart
¶ Sub Micom Firmware update
No USB or FW needed.
- Display has to be in standby
- On Samsung remote (Factory Menu):
<Mute><1><8><2><POWER> - SVC – Upgrade – SUBMICOM UPGRADE: Ready
- When upgrading comes then wait
- Please do not press power key when sub-micom upgrade