¶ Philips Android signage SoC installation
There are special sections relating to the following screens:
The general section covers any supported screen except those listed above.
The digits before “BDL” in a model name are the screen size in inches, not part of the model. 10BDL3051T and BDL3051T are the same screen in a 10 inch panel, so match your screen on the BDL part of the name.
¶ Downloading the latest APK
Screens running Android 4.x cannot use the current APK, which requires Android 5.0 or newer. The BDL4050D and the BDL3051T are in this group and can only run Digital Signage 2.3.4 or earlier. Do not upgrade them to the latest APK.
¶ Option 1: Using a USB stick
The BDL5055P does not recognize USB sticks for APK installation. Use an SD card instead. The steps are otherwise the same.
- Make sure the USB stick is formatted as FAT32. Other formats such as NTFS may not be recognized by the screen.
- Download the latest APK file from https://downloads.digsig.tv on your computer.
- Copy the file to a USB stick.
- Plug the USB stick into the screen.
¶ Option 2: Using the browser
- Open the web browser and go to https://downloads.digsig.tv.
- Click the Philips/ProDVX link.
¶ Installing the APK
¶ Option 1: Using a USB stick
- Go to the section relating to the desired screen to see installation method.
- BDL5055P: use an SD card instead of a USB stick. Installation via USB does not work on this screen.
¶ Option 2: Using the browser
-
Press Open in the popup that appears after downloading.
.jpeg)
-
Press INSTALL/UPDATE.
-
Press OPEN to open the application.
¶ Notification prompt on first start
Depending on the screen's Android version, the first start of the signage app shows a dialog asking “Allow Digital Signage to send notifications?”.
Press “Allow” to dismiss it. The app does not send notifications. The permission only covers the silent system entry for the app's background service, so either answer is safe, and the dialog will not appear again unless the screen is factory reset.
Do not leave the screen before the dialog has been dismissed. It stays on top of the content until someone answers it, so an unattended screen will show the dialog instead of the playlist.
If screens are prepared before they go on site, the permission can be granted in advance so the dialog never appears. After installing the APK, connect to the screen with adb and run:
adb shell pm grant com.thecloudportal.digitalsignage android.permission.POST_NOTIFICATIONS
If your deployment uses an MDM that can pre-grant runtime permissions, granting POST_NOTIFICATIONS through it has the same effect on every screen.
¶ Upgrading the Android application
You do not need to uninstall the old version first. Installing the new APK will update the existing application.
- Download the latest APK
- USB stick
- Find your screens section on this page and follow the “USB stick” instructions.
- Browser
- After downloading the file, follow the Installing the APK browser section.
¶ General Philips Android
¶ Network
¶ Ethernet
Use the LAN port to connect the display to your network.
¶ Wi-Fi
- Enter the Configuration menu.
<Home-1-8-8-8> - Select Settings.
- Select Wi-Fi settings
- Select SSID
- Enter the password
- Connect to the SSID.
¶ How to do a factory reset
- Display must be powered on
- Enter the Configuration menu.
<Home-1-8-8-8> - Select Settings
- Select System Tools -> Factory Reset
- Do a normal installation of the screen
¶ Initial installation
- Power On display
- Welcome -> Select Language -> Start
- Network Setting: Select network connection (BDL3050Q only Ethernet available)
- Ethernet
- Connect the Ethernet cable.
- Wi-Fi
- Select Wi-Fi and press Next
- Enter the password
- Connect to the network
- Skip loading configurations from USB or SD.
- Select Finish
- Ethernet
- BDL3050Q: Main Switch -> Enable
- BDL4050D: Network Setting -> Select DHCP. This screen runs Android 4.x, so install Digital Signage 2.3.4 or earlier rather than the latest APK. See the warning under Downloading the latest APK.
- Signage Display Settings: Skip
- Clone media files into internal: Skip
- Setup Complete: Finish
- Enter the Configuration Menu
<Home-1-8-8-8> - Download the latest APK
- USB stick
- Select Apps
- Select File Manager
- Select to open mnt/usb_storage/
- Select the apk file you downloaded earlier
- Select install
- Browser
- After downloading the file, open the file to install
- USB stick
- After installation, select done and go back to the Configuration Menu.
- Select Settings
- Select Signage Display
- Select Custom App
- Select “Select App”
- Select the APK signage app and save
- Go back to Settings
- Select Date & Time and Select time zone. Select your time zone in the list
- Exit the menu (Click return on remote until you are out)
- If a dialog asks “Allow Digital Signage to send notifications?”, press “Allow”. See Notification prompt on first start.
- The install code is now showing. Follow the next section to complete the installation.
- BDL3050: After exiting the menu, press source button and select Custom as source. The install code will then be shown.
¶ General settings
Power settings
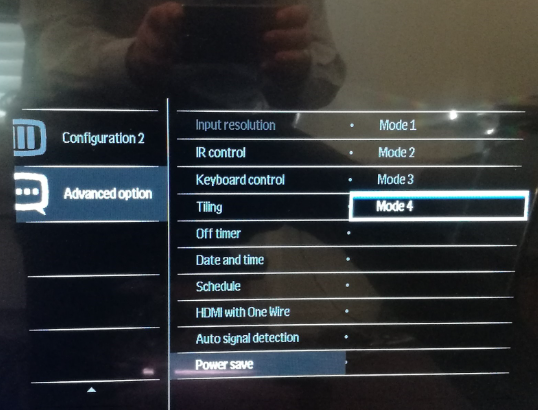
Select Home -> Advanced option -> Power save -> Mode 4
Remove logo
Select Home -> Configuration 2 -> Logo -> Off
¶ Nice to know
¶ Get software version
- Enter the Configuration menu.
<Home-1-8-8-8> - Select Settings
- Select About -> Build Number
¶ Changing network type
- Enter the Configuration menu.
<Home-1-8-8-8> - Select Network
- Select Network Type
- Wired
- Connect
- Wireless
- Select SSID
- Enter Password
- Wired
- Exit menu
¶ BDL5051T & BDL3351T
¶ How to do a factory reset
- Enter Admin mode by pressing Menu and Volume -
- Enter default password “1234”
- Choose “Settings” -> Signage Display -> System tools -> Factory Reset
- Press Factory Reset again and press OK
¶ Initial installation
- Power On display
- Select “Date & Time” and “Select Time Zone” for your time zone.
- Clone Media Files into Internal: Skip
- Signage Display settings: Skip
- Security Setting: Skip
- Network Settings: Choose Wi-Fi or Ethernet
- Wi-Fi: connect to your Wi-Fi network and continue
- Ethernet: Enable Ethernet to continue (recommended)
- Setup Complete: Finish
¶ Screen booted
You may get a message saying: Please enable “Unknown sources” installation first. To get around this, go back to the Configuration Menu -> Security and enable Unknown sources.
- Download the latest APK
- USB stick
- Enter Admin mode again by pressing Menu and Volume -
- Enter default password “1234”
- Select “Storage” and choose the USB stick with the APK file
- Select the APK file
- Select “Open”
- Select “Install”
- Browser
- After downloading the file, open the file to install
- USB stick
- After installation, select done and go back to the Configuration Menu
- Select “Settings”
- Select “Signage Display”
- Select “General Settings” -> Boot on source -> Input -> Custom App
- Go back to “General Settings” and select “Boot Logo” -> “OFF”
- Go back to “Signage Display”
- Select “Source Settings” -> Custom App -> Select App -> Select the signage APK app -> Save
- Go back to “Settings”
- Select “Display” and disable “Auto-rotate screen”
- Exit the menu
- If a dialog asks “Allow Digital Signage to send notifications?”, press “Allow”. See Notification prompt on first start.
Now you should see the install code on screen.
¶ BDL4550D & BDL3550Q
¶ Network
¶ Ethernet
Use the LAN port to connect the display to your network.
¶ How to do a factory reset
If the display has not been set up before, the TV will power on in the “Install menu”, shown below. The factory reset can then be skipped.
- On the remote: Press the home button and when a menu shows press 1-8-8-8 to enter Android menu
- Enter Settings -> Signage Display -> System Tools -> Factory Reset. Select Factory reset and then OK.
- The screen will now reset to factory settings.
¶ Initial installation
- Power On display
- Welcome -> Select Language -> Start
- Security Setting: Skip
- Signage Display Settings: select Manual Setup and Next
- Signage Display Name: Skip
- Remote Control: Skip
- Network Settings:
- BDL4550D: Choose Wi-Fi or Ethernet
- Wi-Fi: connect to your Wi-Fi network and continue
- Ethernet: Enable Ethernet to continue
- BDL3550Q: See that Ethernet is selected and press next
- Ethernet: Enable Ethernet to continue
- BDL4550D: Choose Wi-Fi or Ethernet
- Clone Media Files into Internal: Skip
- Setup Complete: Finish
Now you get some questions about access:
- Allow CMND&Deploy to access photos, media, and files on your device? Allow
- CMND & Deploy: I Accept and Continue
- Now a message saying updates are available. Select LATER since this is just for updating Teamviewer app which we do not use.
- Press the Home button on the remote to open built in settings
- Advanced Option -> Date and time: Choose time zone and check that the time and date is correct. If not, turn off Auto Sync and set time and date manually.
- Exit the menu.
- Press the home button and when a menu shows press 1-8-8-8 to enter Android menu
- Follow the General settings described below
¶ General settings
¶ Installing the signage app
You may get a message saying: FILE MANAGER: for your security, your TV is not allowed to install unknown apps from this source. Select settings and select Allow from this source.
- Download the latest APK
- USB stick
- From the Android Menu select Storage -> USB
- Find the APK downloaded to install the Signage app.
- Select install. When installation is finished, select OPEN to start the Android Signage app.
- If a dialog asks “Allow Digital Signage to send notifications?”, press “Allow”. See Notification prompt on first start.
- After installation is completed, unplug the USB stick.
- From the Android Menu select Storage -> USB
- Browser
- After downloading the file, open the file to install
- USB stick
- The signage app should now open and display the install code
¶ Nice to know
¶ Get software version
- Use the Philips controller and press the home button and when a menu shows press 1-8-8-8 to enter Android menu
- Select Settings -> System -> About
To check for newer versions: Settings -> System Update. See that Online Update is activated. It will then check automatically when booting the screen.
¶ 24BDL4151T
¶ How to do a factory reset
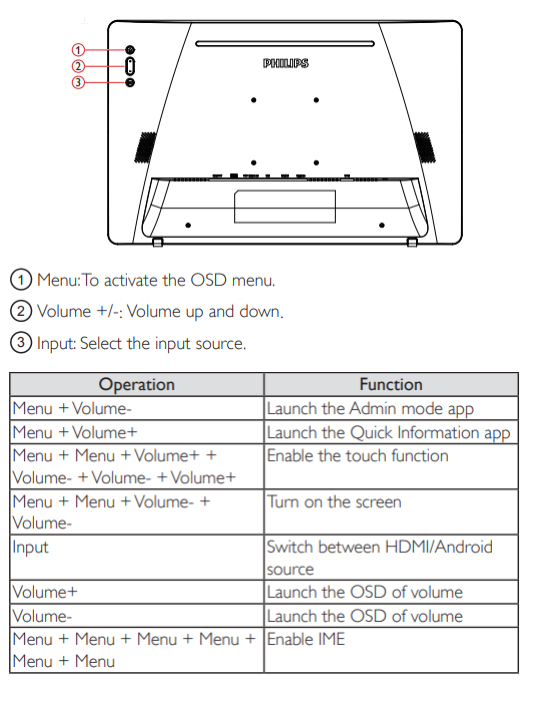
- Enter Admin mode by pressing Menu and Volume -
- Enter default password “1234”
- Choose “Settings” -> Signage Display -> System tools -> Factory Reset
- Press Factory Reset again and press OK
The system will boot back up to factory default.
¶ Initial installation
- Welcome Screen: Select Language and press Start
- Signage Display Settings: Press “Skip”
- Network Type: Ethernet/Wi-Fi
- Ethernet: Connect your ethernet cable into the screen.
- Wi-Fi:
- Select Wi-Fi
- Press Next
- Select SSID
- Enter Password
- Connect to Network
- Skip loading configurations from USB to SD
- Select finish
¶ Screen booted
- Download the latest APK
- USB stick
- Enter Admin mode again by pressing Menu and Volume -
- Enter default password “1234”
- Select “Storage” and choose the USB stick with the APK file
- Select the APK file
- Select “Open”
- Select “Install”
- Browser
- After downloading the file, open the file to install
- USB stick
- After installation, select done and go back to the Configuration Menu
- Select “Settings”
- Select “Signage Display”
- Select “General Settings” -> Boot on source -> Input -> Custom App
- Go back to “General Settings” and select “Boot Logo” -> “OFF”
- Go back to “Signage Display”
- Select “Source Settings” -> Custom App -> Select App -> Select the signage APK app -> Save
- Go back to “Settings”
- Select “Display” -> “When device is rotated” -> “Stay in current orientation”
- Go back to “Settings”
- Select “Date & Time” and “Select Time Zone” for your time zone.
- Exit the menu
- If a dialog asks “Allow Digital Signage to send notifications?”, press “Allow”. See Notification prompt on first start.
Now you should see the install code on screen.
¶ 10BDL4551T
¶ Network
¶ Ethernet
Use the LAN port to connect the display to your network.
¶ How to do a factory reset
If the display has not been set up before, the TV will power on in the “Install menu”, shown below. The factory reset can then be skipped.
- Enter the Android menu. Stop key, then Volume down key. Pincode 1-2-3-4
- Enter Settings -> Signage Display -> System Tools -> Factory Reset. Select Factory reset and then OK.
- The screen will now reset to factory settings.
¶ Initial installation
- Power On display
- Welcome: Select language and select Start
- Security Setting: Skip
- Signage Display Settings: select Manual Setup and Next
- Signage Display Name: Skip
- Remote Control: Skip
- Network Settings:
- Choose Wi-Fi or Ethernet
- Wi-Fi: connect to your Wi-Fi network and continue
- Ethernet: Enable Ethernet to continue
- Choose Wi-Fi or Ethernet
- Clone Media Files into Internal: Skip
- Setup Complete: Finish
When CMND & Deploy shows:
- Enter the Android menu. Stop key, then Volume down key. Pincode 1-2-3-4
- Follow the General settings described below
¶ General settings
¶ Installing the signage app
You may get a message saying: FILE MANAGER: for your security, your TV is not allowed to install unknown apps from this source.
- Download the latest APK
- USB stick
- From the Android Menu select Storage -> USB
- Find the APK downloaded to install the Signage app.
- Select install. When installation is finished, select OPEN to start the Android Signage app.
- Browser
- After downloading the file, open the file to install
- USB stick
- Select settings and select Allow from this source.
- Press the back button on the remote to continue installation
- If a dialog asks “Allow Digital Signage to send notifications?”, press “Allow”. See Notification prompt on first start.
The signage app should now open and display the install code.
After installation is completed, unplug the USB stick.
¶ Nice to know
¶ Get software version
- Enter the Android menu. Stop key, then Volume down key. Pincode 1-2-3-4
- Select Settings and open About -> Device Info.
¶ 10BDL3051T
This screen runs Android 4.x and cannot use the current APK. It can only run Digital Signage 2.3.4 or earlier, so the steps below apply to that version.
¶ Network
¶ Ethernet
Use the LAN port to connect the TV to your network.
¶ Wi-Fi
- Enter the Configuration menu. Stop key, then Volume down key
- Pincode
<1111> - Select Settings.
- Select Wi-Fi settings
- Select SSID
- Enter the password
- Connect to the SSID.
¶ How to do a factory reset
- Display has to be powered on
- Enter the Configuration menu. Stop key, then Volume down key.
- Pincode
<1111> - Select Settings
- Select System Tools -> Factory Reset
Continue to do a normal installation of the screen
¶ Initial installation
-
Power On display
-
Select Language.
-
Select network connection
- Ethernet
- Connect the Ethernet cable.
- Wi-Fi
- Select Wi-Fi and press Next
- Select SSID
- Enter the password
- Connect to the network
- Skip Signage Display settings.
- Skip loading configurations from USB or SD.
- Select Finish
- Ethernet
-
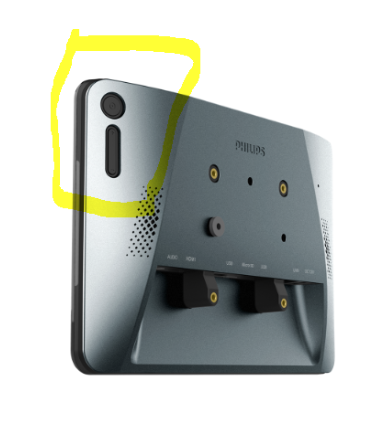
Enter the Configuration Menu. Stop key, then Volume down key
-
Stop and volume keys are located on the back side of the screen:
-
Enter pincode. Default pin is: 1234.
-
Select Settings
-
Select Signage Display
-
Select “Change Administrator Password”
-
Enter old pin code.
<1234> -
Enter new pincode
<1111> -
Exit to Configuration Menu.
-
- USB stick
- Select Apps
- Select File Manager
- Open mnt/ -> usb_storage -> USB_DISK1
- Open the APK-file
- Select install
- Browser
- After downloading the file, open the file to install
- USB stick
-
After installation, select done and go back to the Configuration Menu.
-
Select Settings
-
Select Signage Display
-
Select Custom app
-
Click Select App, choose the signage APK and save
-
Return to Signage Display
-
Select “Boot on source”
-
Select Input
-
Select “Custom app”
-
Select Date & Time and Select time zone.
-
Exit the menu
-
If a dialog asks “Allow Digital Signage to send notifications?”, press “Allow”. See Notification prompt on first start.
The install code should now be showing. Follow the next section to complete the installation.
¶ Nice to know
¶ Get software version
- Enter the Configuration menu. Stop key, then Volume down key
- Select Settings
- Select About -> Build Number
¶ Changing network type
- Enter the Configuration menu. Stop key, then Volume down key
- Select Network
- Select Network Type
- Wired
- Connect
- Wireless
- Select SSID
- Enter Password
- Wired
- Exit menu