¶ Google Cast Management System configuration
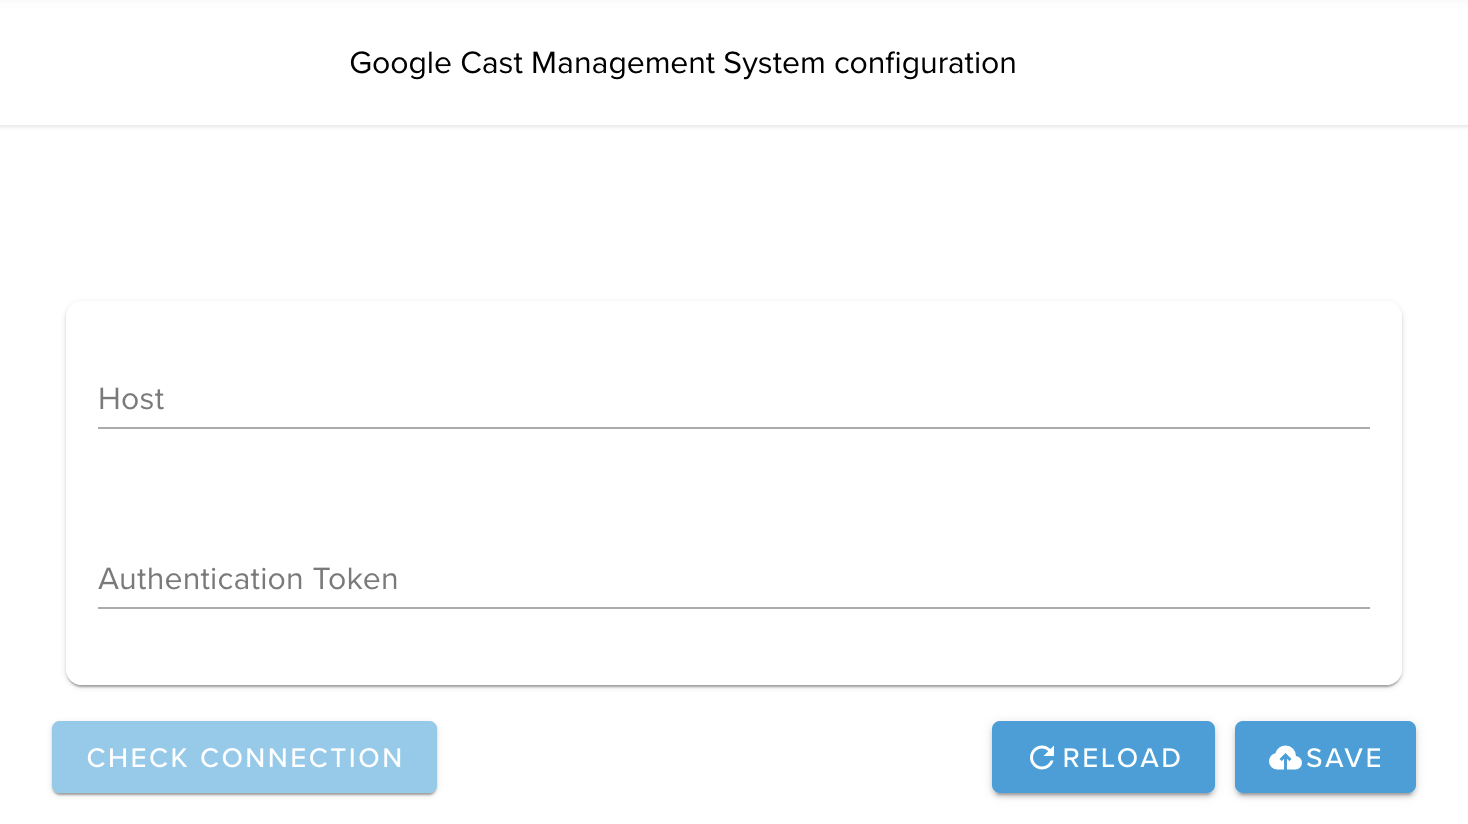
The Google Cast Management System Configuration can be found on a site under 'Administration/Google Cast Configuration'.
This is the initial configuration for managing Google Casts.
- Host: The LAN IP address to the Cast Server, needed in order to establish a connection between it and the rest of the system.
- Authentication Token: Token to authenticate with the Cast server.
When a new configuration is saved, a check will be performed to verify the host & auth tokens. If a connection is established, the 'Check connection' button changes to display that the connection has been established. If the button is not in its verified state, you can click it to make the check manually.
¶ Status
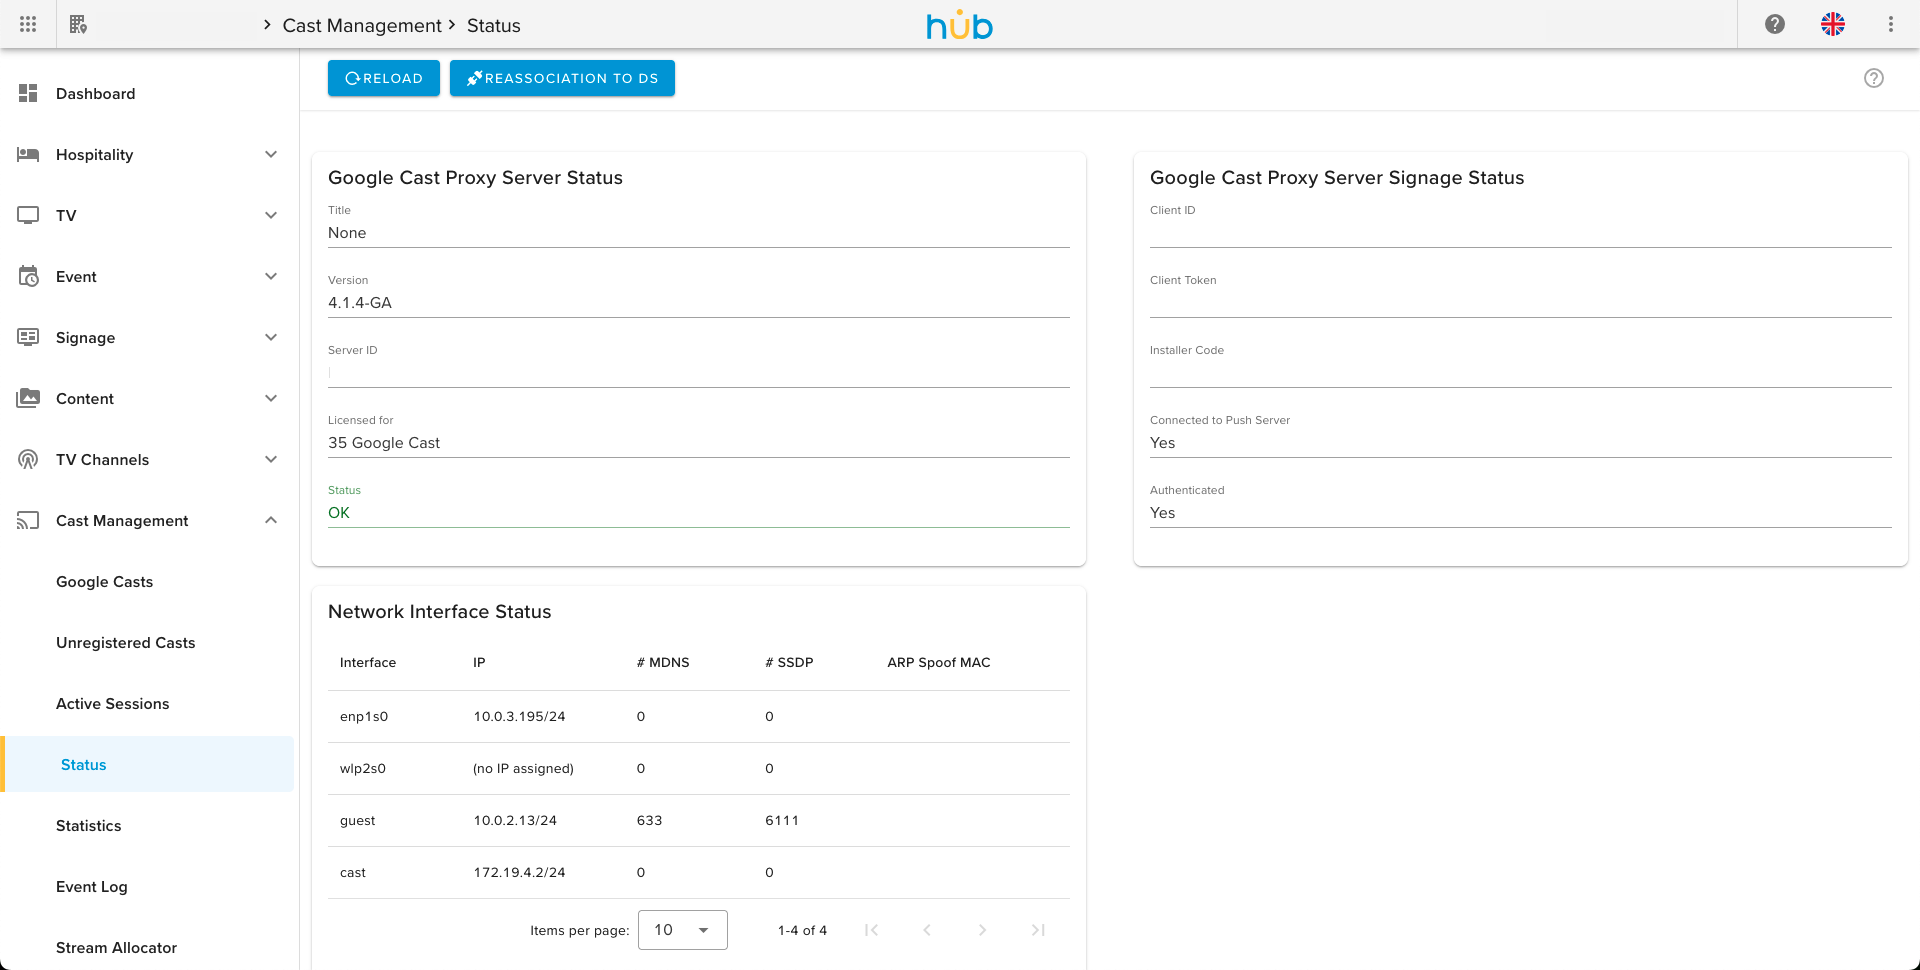
The status page provides 3 separate status panels, when signage integration is enabled, two otherwise. Each panel is described below.
The Reload button reloads data for all visible panels.
¶ Google Cast Proxy Server Status
This panel shows the general status of the Google Cast proxy.
- Title: The name of the server installation.
- Version: The current version of the server installation.
- Server ID: The ID of the server.
- Licensed for: Number of casts allowed to connect to the server.
- Status: General status of the server.
¶ Google Cast Proxy Server Signage Status
This panel will only be visible when the signage integration is enabled. See the configuration section for how to enable the signage integration.
- Client ID & Client Token: Mostly used for debugging purposes.
- Installer Code: Use this to authorize the Google Cast proxy with the signage system.
- Connected to Push Server: Indicates whether or not the systems are connected.
- Authenticated: Indicates whether or not the Google Cast proxy has been authorized with the signage system.
The Reassociation to DS button, which is also only visible when the signage integration is enabled, makes the Google Cast proxy reconnect to the signage system giving the server a new Installer code. This should only be used in case of moving to a new site or removing it from an existing site.
¶ Network Interface Status
Note: This panel requires a server version >= 3.10.0 to provide all columns of data.
- Interface: Name of the network interface
- IP: The IP address of the network interface, if any.
- # MDNS: Number of MDNS packets received on this interface since the server was started. This only counts MDNS packets relevant to the Google Cast proxy solution and not all MDNS packets received.
- # SSDP: Number of SSDP packets received on this interface since the server was started.
- ARP Spoof MAC: The MAC address of the device spoofing ARP requests, if any.
¶ Configuration
This page is the main configuration for the server and networks. Here you have the choice of 3 tabs: Google Cast Proxy Configuration, Networks and Advanced Networking, all of which will be explained in the following sections.
¶ Google Cast Proxy Configuration
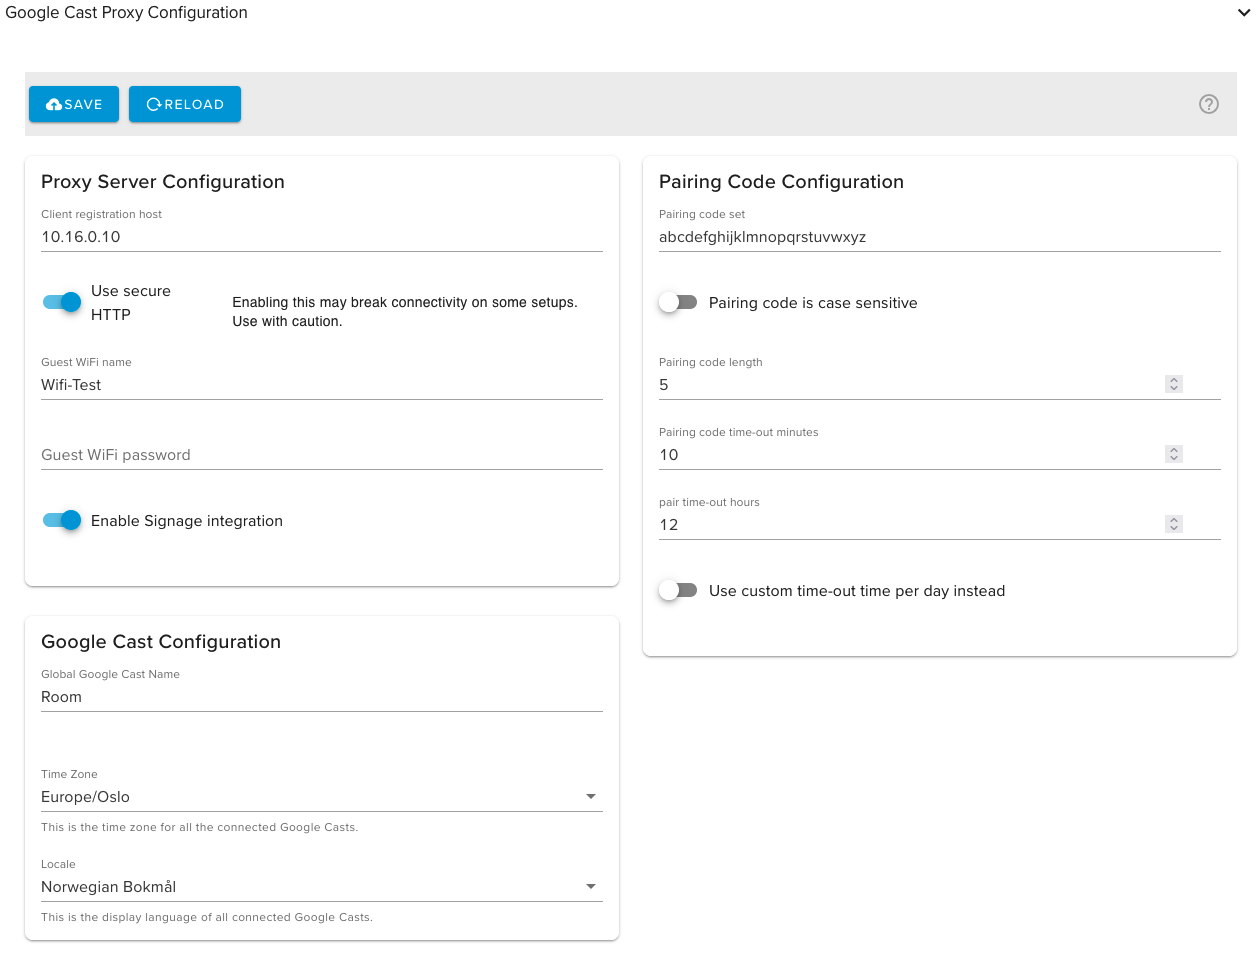
Here we configure the proxy server for the Google Casts under a site, explained below.
¶ Proxy Server Configuration
-
Client registration host: This is the URL to go to when registering the guest devices. This can be an IP address or a DNS name if the IP address has a DNS name registered. In the case that there is only one guest network, then the IP reserved for the Cast server on the guest network can be used as the Client registration URL (or its corresponding DNS name). This could be the IP of the web interface of the Cast server or it could be a DNS name pointing to that IP
-
Use secure HTTP: Option to enable using SSL (HTTPS). This requires the use of authentic SSL certificates and the user is personally responsible for procuring and maintaining these. Enabling this will break connectivity without the required SSL certificates.
-
Guest WiFi name: The name (SSID) of the guest network that guests should connect their devices to. This can be shown on-screen (in stand-alone mode) to users as guiding information.
-
Guest WiFi password: The password needed to connect to the guest network. Again, this can be shown on-screen (in stand-alone mode) to users.
-
Enable Signage Integration: This enables Signage Integration, this is not needed to show the QR or Pairing Code. This feature must be requested to be used.
¶ Pairing Code Configuration
-
Pairing code set: The set of valid characters to use as part of the pairing code. The pairing code must be entered when registering guest devices. For most cases the default should be fine. But, if desired one can also use numbers in addition to or instead of letters. Please note that reducing the number of possible characters (e.g. using only numbers – 10 characters – instead of the default – 26 characters) dramatically reduces the number of possible pairing codes. As a rule of thumb; if the number of valid characters is reduced, then increase the pairing code length.
-
Pairing code is case sensitive: Should the check on code be case sensitive or case insensitive. E.g. if this setting is selected (case sensitive) then the following codes do not match: “catTo” and “catto” (note the capital “T” in the first code). If the setting is unselected (case insensitive), then those codes do match.
-
Pairing code length: The number of characters that constitute a pairing code. This should be long enough to provide unique codes per pairing while as short as possible to make them easy to enter when registering guest devices. The system will guarantee that each pairing code is unique, or, if that is not possible, then no pairing code will be provided until there exists at least one available pairing code. The length can therefore be set according to an estimate of how many guest devices there will be. We recommend a minimum of 4 and a maximum of 8.
-
Pairing code timeout-minutes: The number of minutes a pairing code will stay valid. If no guest device has registered with this code within this time span, then the pairing code will be discarded and a new one will be generated.
-
Pairing timeout hours: Cast will automatically disconnect any pairs created more than this number of hours ago. Set to 0 to disable automatic disconnects.
-
Use custom time-out per day instead: Instead of Pairing timeout hours you can specify a time of day Mon-Sun that you want the Google Casts to remove paired devices. Only the checked days will be removed. In this example it will clear paired devices Monday at 11:00 and Wednesday at 15:00.
¶ Google Cast Configuration
-
Global Google Cast Name: This is a global name that will be shown to the guest when trying to cast. The server will try to rename all Google Casts to this name for better user experience.
-
Time Zone: Server will try to set Google Cast time zone to this if it has access.
-
Locale: Server will try to set Google Cast language to selected locale if it has access.
¶ Networks
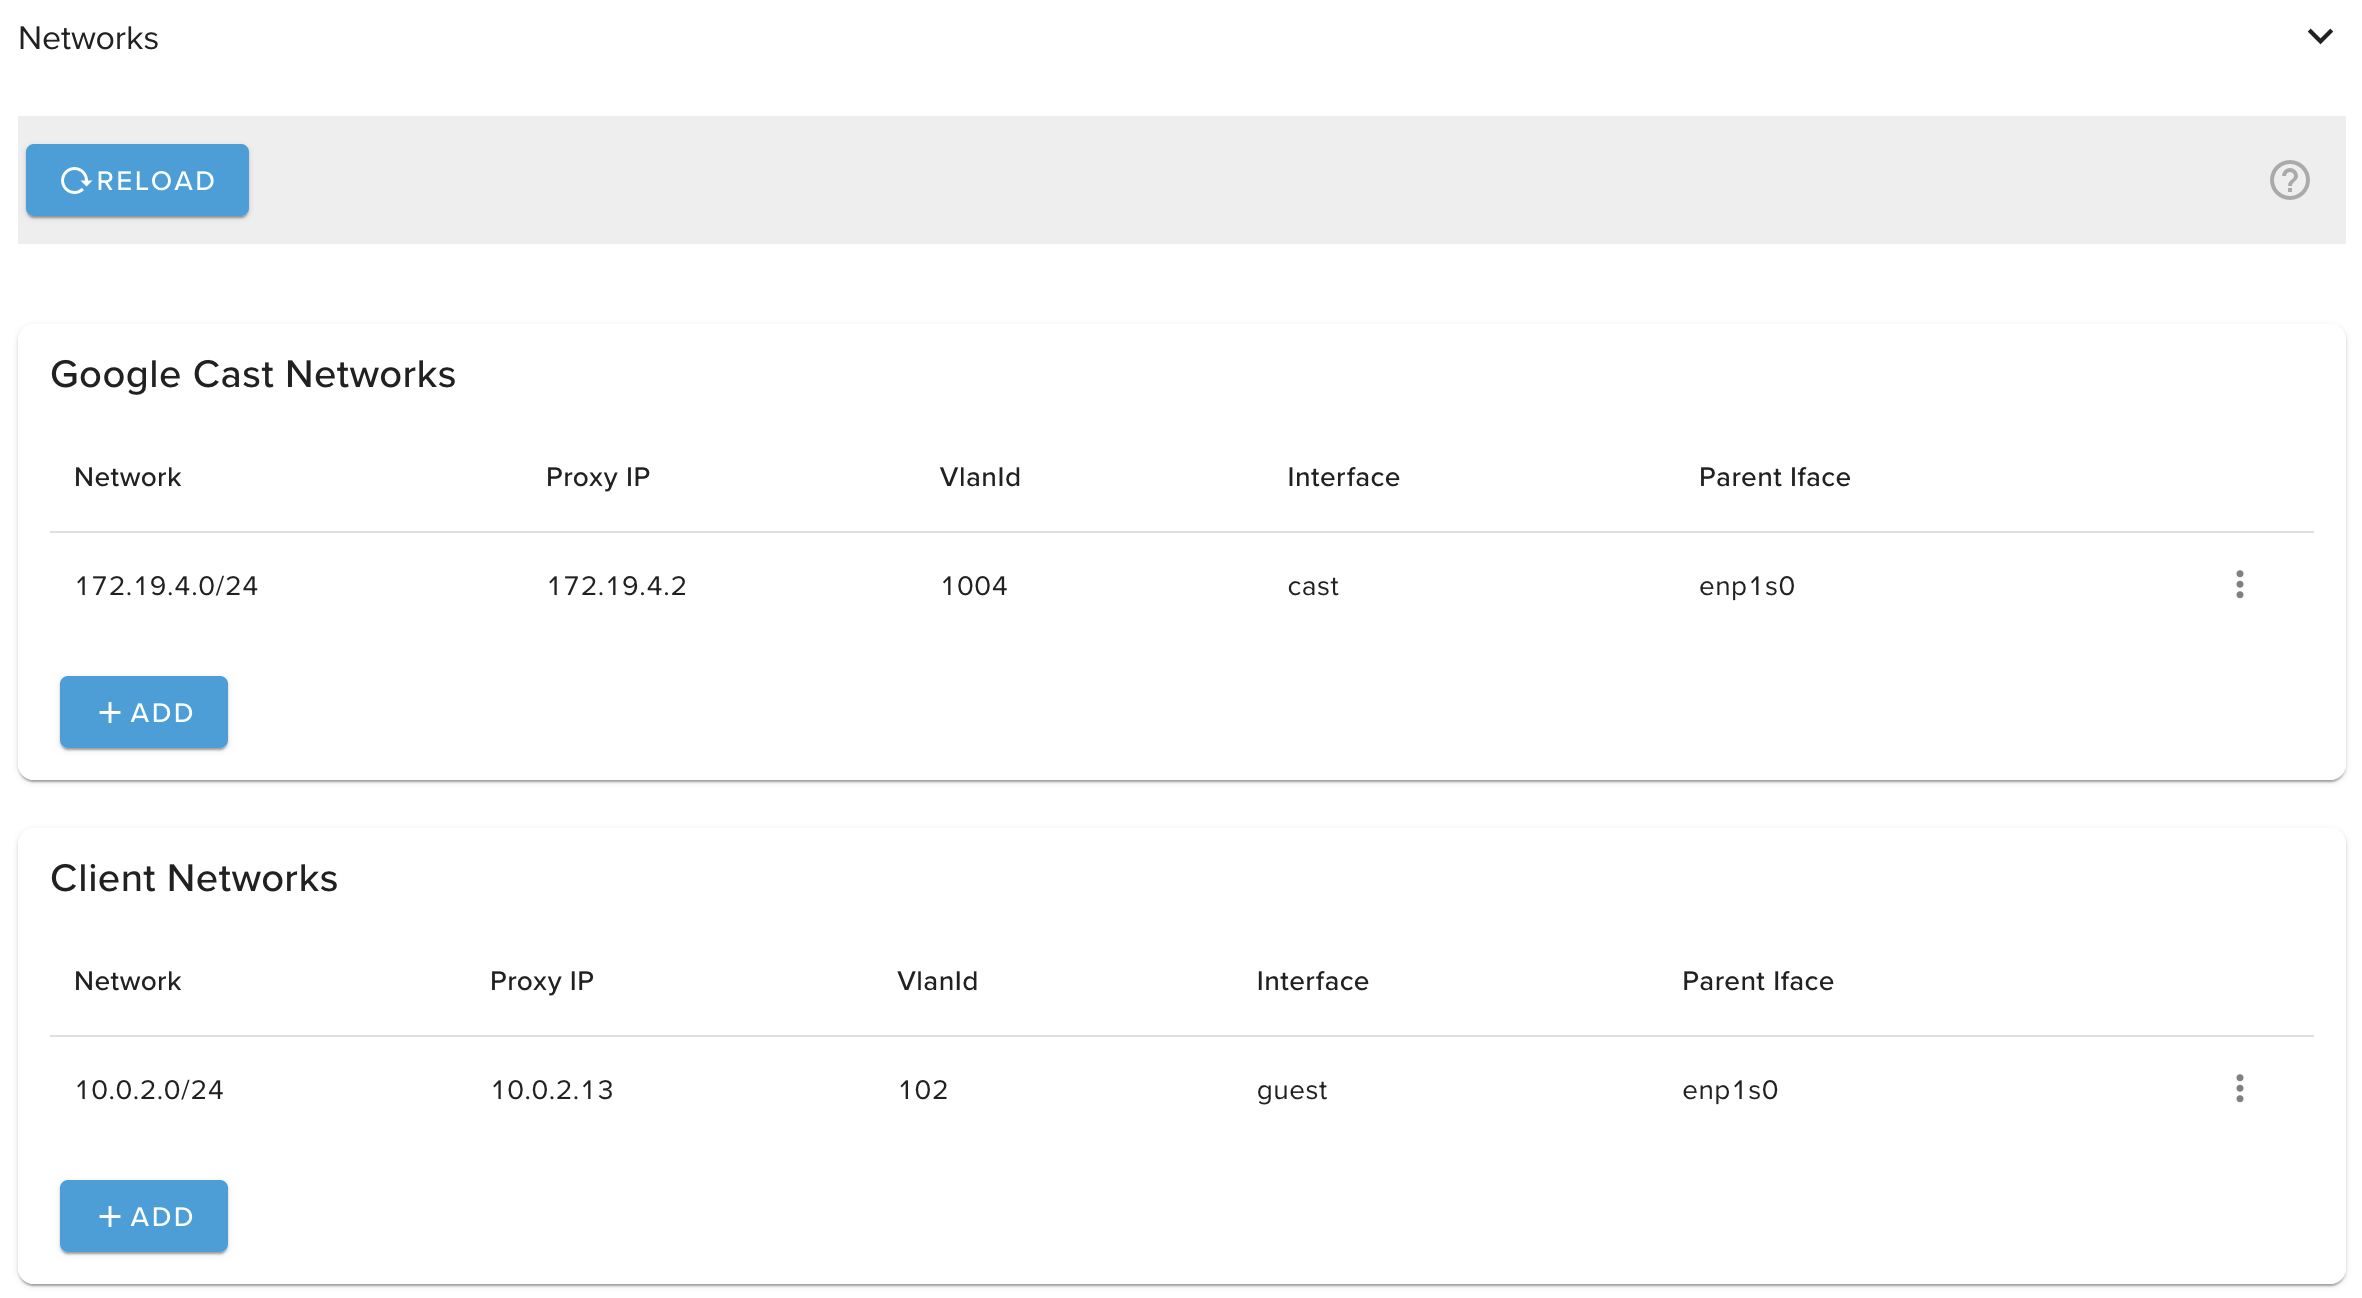
Under networks you add both the Google Cast network and the Client network. There can be multiple networks depending on your network configuration but the most used is one for each side. You can delete a network by clicking or right clicking on it. The list must be updated manually with the reload button.
When selecting one or more networks in the list it will show the context menu:
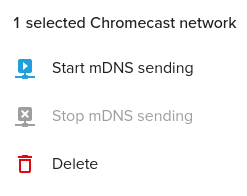
- Start mDNS sending / Stop mDNS sending: For testing if a network has mDNS enabled. Turn on/off sending of test packets on the selected network. After enabling, it will send a multicast mDNS response packet every 2 seconds for the service
_googlecast._local.tcp. The response should provide a name for the service that indicates that this is a test packet.
Test Procedure:
- To test the network you need access to the OtrumCast server running version 4.0.1 or later version.
- After enabling on a network, open a terminal on the OtrumCast server.
- Issue the following command
tcpdump -nni <OS_NETWORK_NAME> udp port 5353- If you see a similar output as in the picture below, you have verified that the network sends out mDNS packets.
- Now execute the same command on your computer. The computer must be on the
<OS_NETWORK_NAME>. If you see the same packets, you have verified that devices recieves mDNS packets.

- Delete: Delete the selected network(s).
Note: If you have multiple client networks you will need to set up parts of the advanced networking.
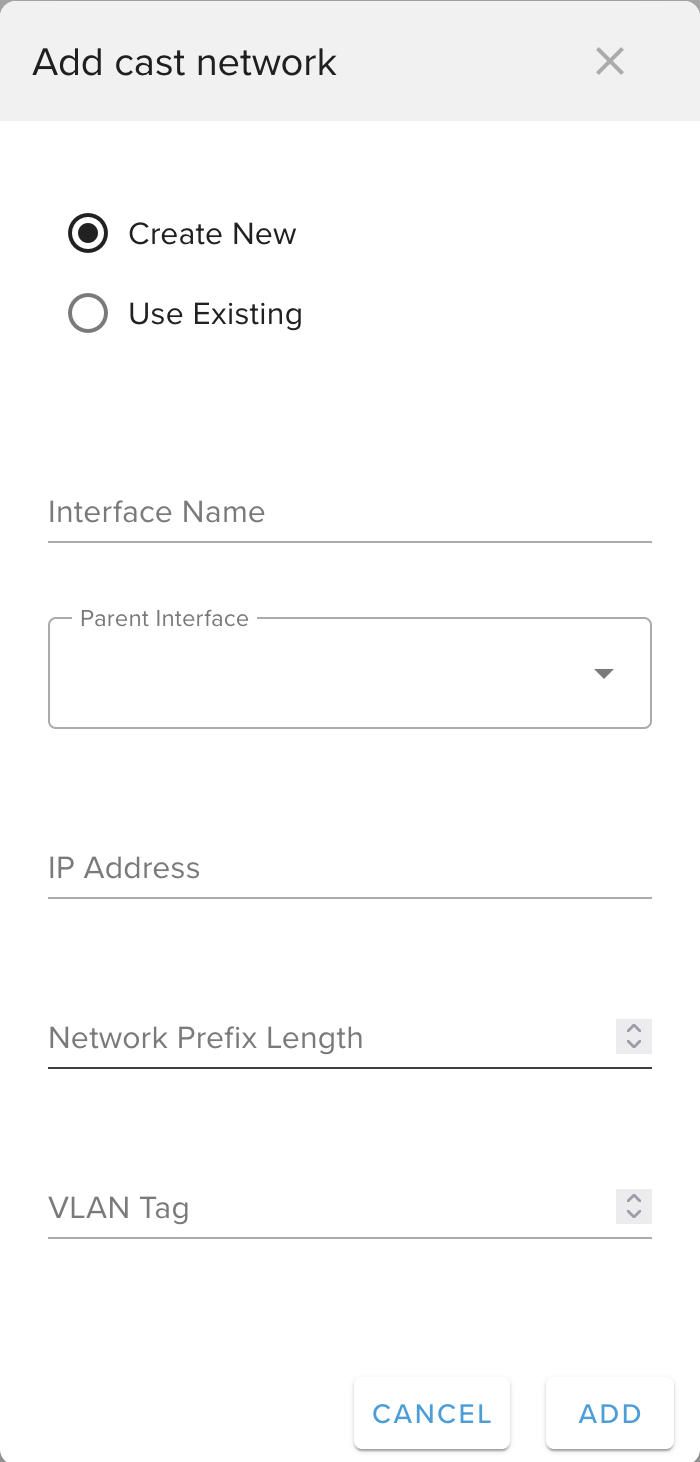
¶ Add Network
To add a network press the Add button on the corresponding network and fill inn the information.
-
Interface: Unless specific VLAN network interfaces have been set up at the OS level or is untagged on a existing interface, always select Create New.
-
Interface name: Enter a descriptive name for the interface to be created. The name can consist of English alphanumeric characters, underscore (_) and dash (-) (no spaces or special characters).
-
Parent interface: Select the network interface where the network to be configured is connected (e.g. eno1). This is the interface where the VLAN traffic is.
-
IP Address: If the Cast server will be used as the DHCP server for the network (see Advanced Networking), then choose the first IP from the valid host IP range. If a separate DHCP server will be used, then insert the IP address reserved for the Cast server for the network to be configured
-
Network Prefix Length: This is the slash denotion (example: 10.0.0.1/24) of the network, it is used to calculate network size. As the example is /24 that covers 10.0.0.0 → 10.0.0.255.
-
VLAN Tag: The VLAN ID that traffic for this network is tagged with.
Finally click the Add button to add the network to the configuration. This will trigger the creation of a virtual network interface at the OS level. If the Cast server is configured to be a DHCP server for the network, this will also trigger an update of the DHCP service to provide IP addresses for the network.
Note: This is the only way to add VLAN, do not try to add them manually via SSH or any other
means. VLAN’s shall be created using the portal.
¶ Advanced Networking
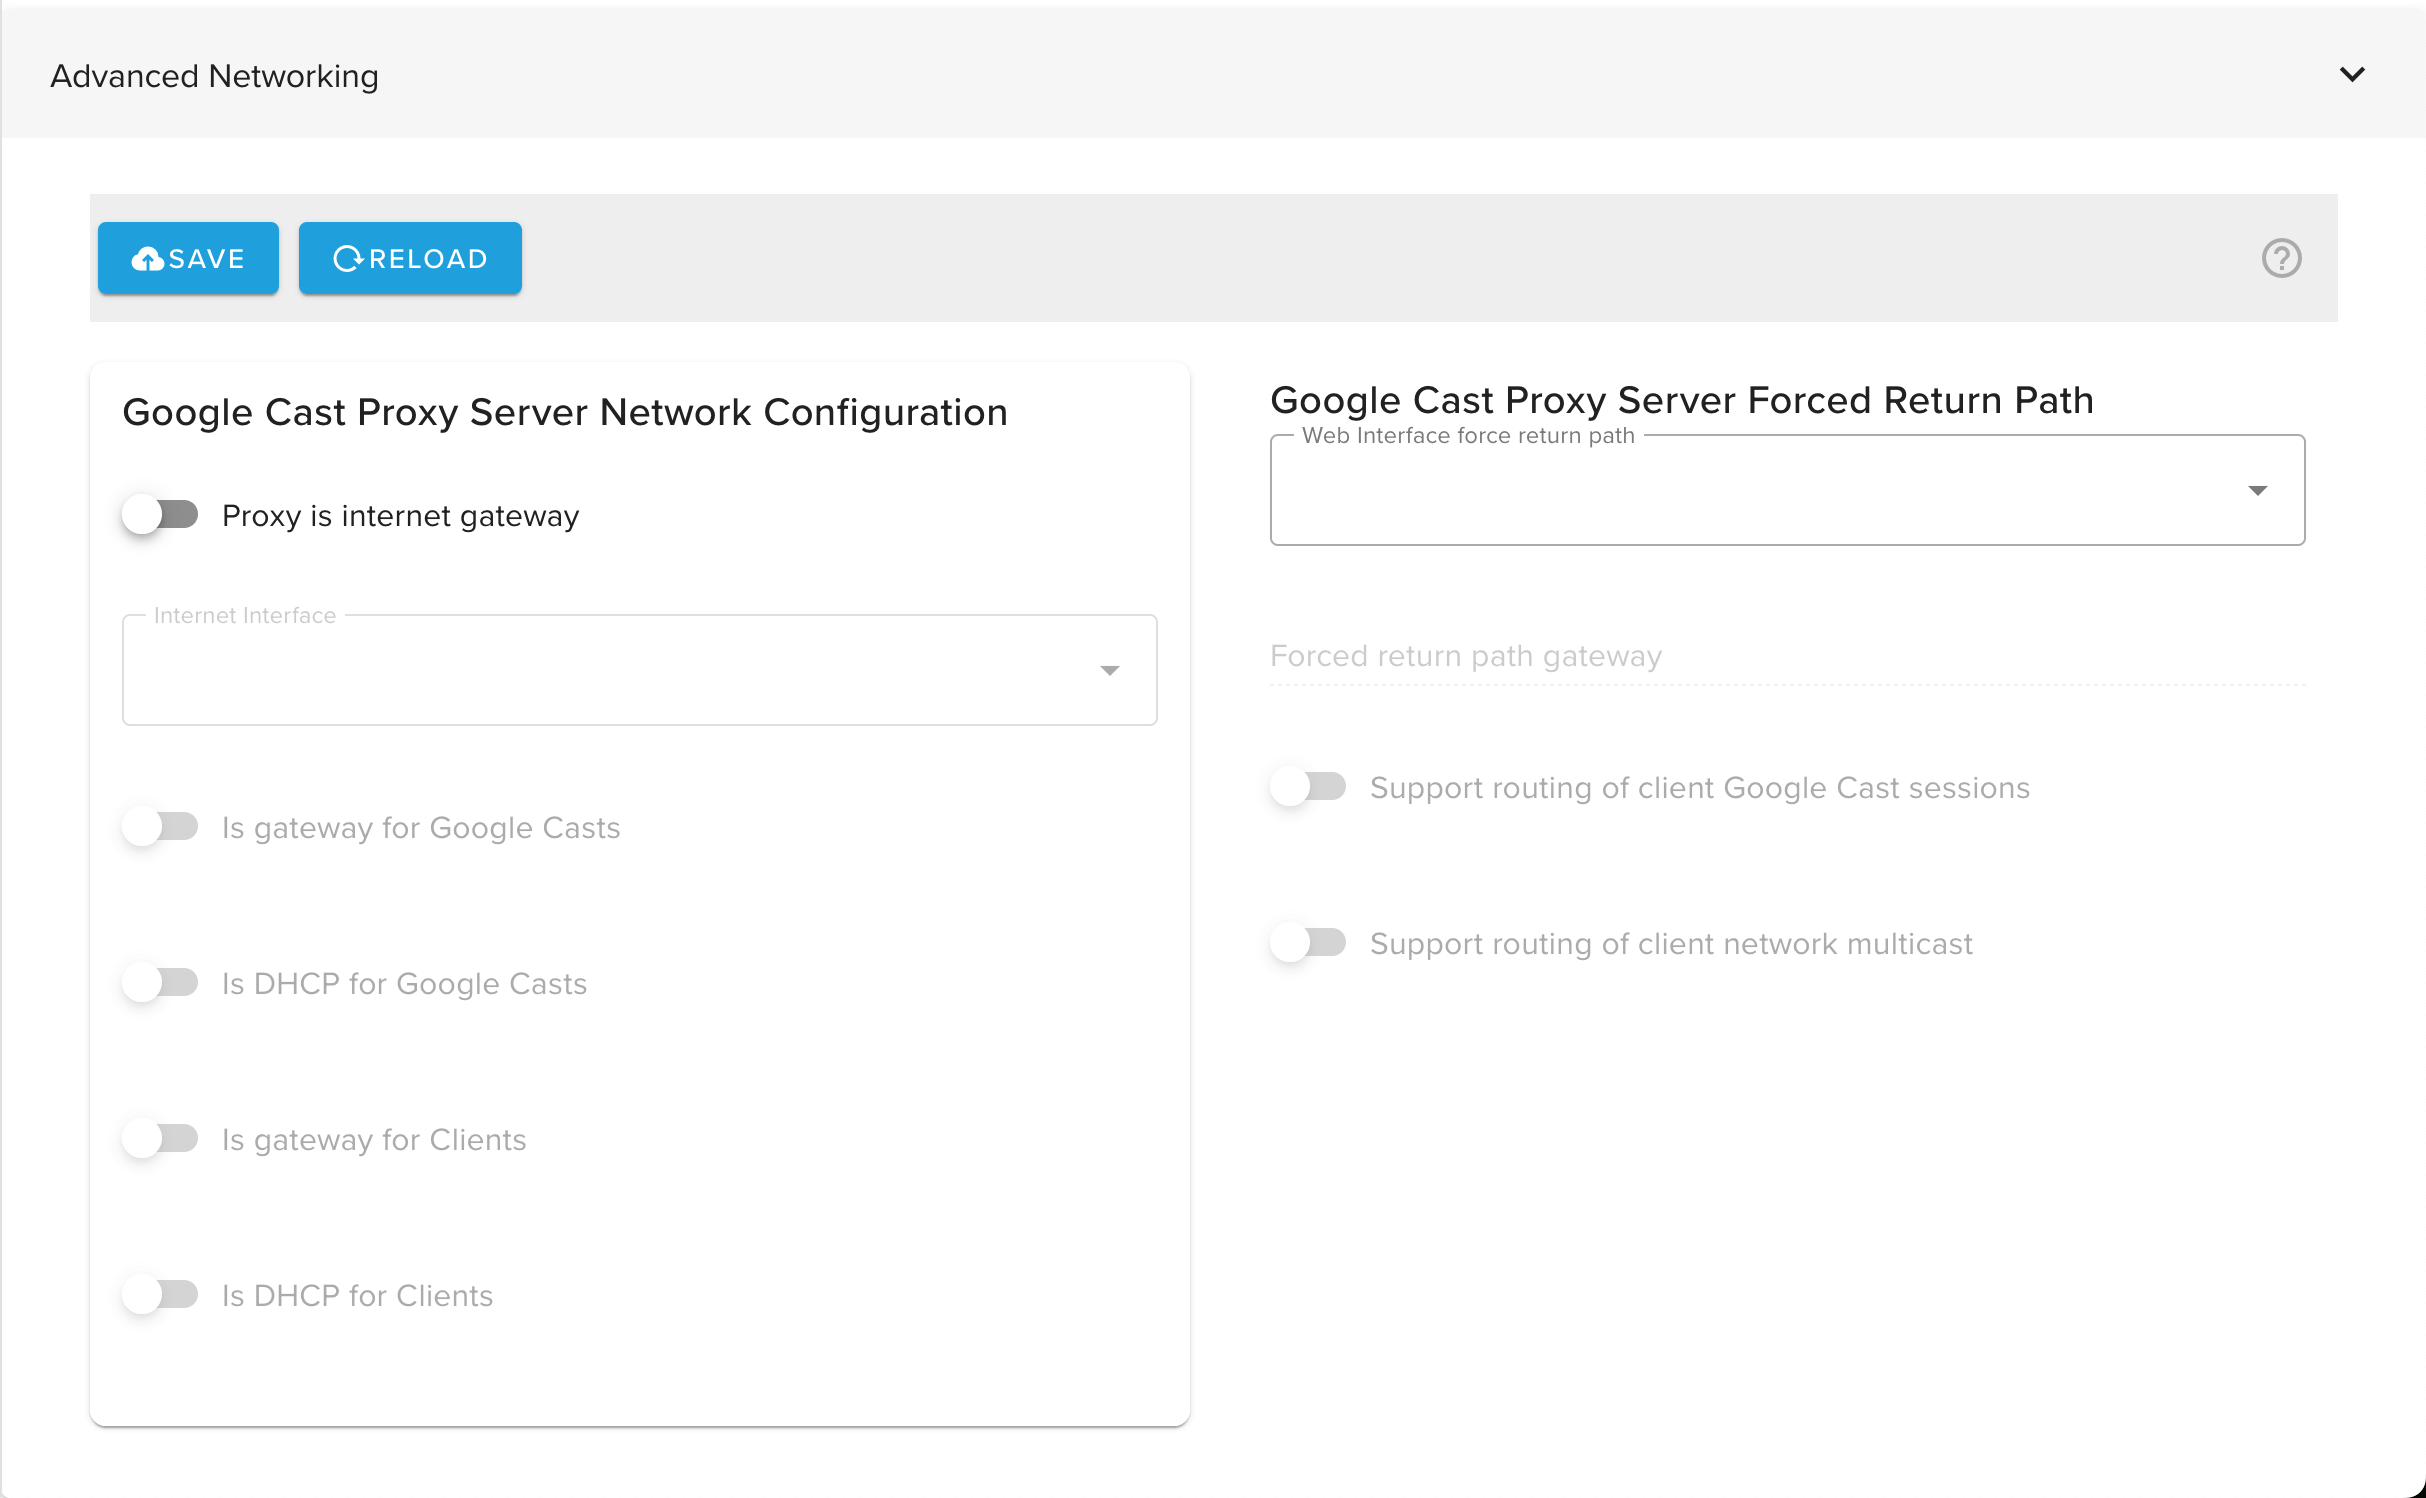
There are to sections, on the left is the Google Cast proxy server network configuration:
- Proxy is internet gateway: Turn this on if the Google Cast proxy server shall act as an Internet gateway (IGW) for either the client network(s), Google Cast network(s) or both. This will enable further options below to be set.
Warning: This is generally not recommended, however this can be used when network traffic for the networks involved is known to be limited, i.e. will not overload the Google Cast proxy server.
-
Internet interface: Select the network interface to use for routing non-local (e.g. Internet) network requests.
-
Is gateway for Google Casts: Select this if the Cast server should act as an IGW for all the Google Cast networks. If selected, the setting below is enabled.
-
Is DHCP for Google Casts: Select this if the Cast server should provide IP addresses and basic network configuration through DHCP for all Google Cast devices on all Google Cast networks.
-
Is gateway for Clients: Select this if the Cast server should act as an IGW for all the client device networks. If selected, the setting below is enabled.
-
Is DHCP for Clients: Select this if the Cast server should provide IP addresses and basic network configuration through DHCP for all client devices on all client device networks.
On the right is the Google Cast proxy server forced return path:
-
Web interface force return path: If there are several client networks or the client registration URL is set to an IP address outside of the client network IP range, then editing the Web interface force RP field will be necessary. This is described in more detail in the Advanced Networking document available at request from partner support.
-
Forced return path gateway: Only set this if this shall be different than the default gateway for the chormecast proxy server. This shall be the IP address of the gateway.
-
Support routing of client Google Cast sessions: Use this if it is not possible to exempt the Google Cast proxy from client isolation on the client network(s).
-
Support routing of client network multicast: Use this if client isolation, or some other network feature, makes it impossible or multicast packets to reach the Google Cast proxy. If this is the case then this must be enable and multicast packets from the client network(s) must be forwarded (e.g. bonjour-forwarding) to the Google Cast proxy server DMZ/Internet interface.