¶ Overview
API Templates are a way of retrieving and displaying dynamic data retrieved from a network data source. This source is typically an API. API Templates are components meant to be included as part of static or interactive menu screens. An example of such a component could be a departure board displaying arrivals and departures for train or bus stations.
This document will include several examples of API Template usage to emphasize the flexibility of this system.
How API Templates work can be described in 2 main steps:
- Fetch dynamic data from an API(data source).
- Process and display the data using a freemarker template.
An API Template has the following characteristics:
- Consists of an API Connector and an API Template that uses the Connector.
- Is bound to individual sites and can be copied to other sites.
- Allows users to define what data they want and from where.
- Supports code logic, HTML and CSS in order to process the retrieved data and display it in a desired manner.
The following chapters will show how API Connector/API Templates work and how to create and edit them by using an example API called {JSON}Placeholder.
Documentation: https://jsonplaceholder.typicode.com/
API Templates use the Templating Engine Freemarker: https://freemarker.apache.org/
Manual: https://freemarker.apache.org/docs/index.html
To create an API Template open the Content → API Templates portal page. The basic workflow for creating an API Template is as follows:
¶ Create an API Connector
A template requires an API Connector to fetch the data to be processed. First click the ‘API Connectors' button:

Then click the ‘Create API Connector’ button:

The API Connector configuration provides the details required to establish a connection to an API. It can optionally define parameters to be used in the Template as a means of defining what data to fetch.
The window below shows a number of fields that are part of defining an API Connector.
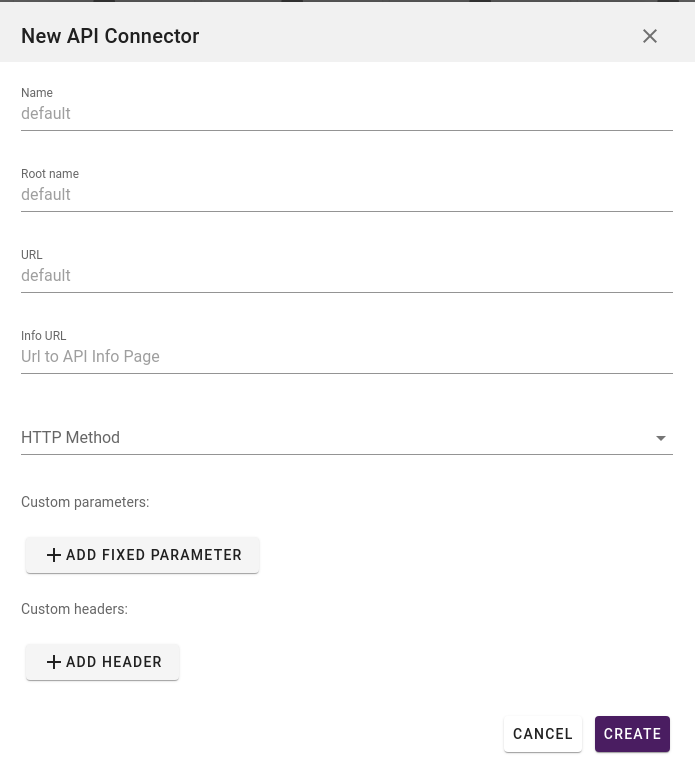
Name (Required): The name of the API Connector
Root Name (Optional): When data is retrieved from an API, its structure can vary greatly, therefore the Root Name serves as a wrapper for this data in order to ensure that it’s usable by the API Template. Here we choose our root name as “myRoot”. If no Root Name is chosen by the user it defaults to ‘root’
The Root Name does not support defining a path such as: “<root>.<pathname>”.
URL (Required): The URL of the API providing the data. This can be either the base URL of the API or the base URL + endpoint of the user’s choosing if the API supports it.
Example: https://someAPI.com/someEndPoint
Info URL (Optional): If the chosen API has documentation available from some network address, it can be referenced in this field.
HTTP Method (Required): Currently POST and GET methods are supported, how these are used will be further explained in the API Template section.
Custom Parameters (Optional): The user can add custom parameters which will be used when making requests to the target API, these parameters typically define what kind of data to get. We can define the parameter name and its type and all parameters added in an API Connector will appear in the Template using it. The following kinds of parameters are supported:
-
Path Parameter - Typically used to identify a specific API resource or resources and is added at the end of the URL used to request data from the API.
Here we have defined a parameter named “Resource” because it defines what kind of resource to fetch from an API and this should be evident from its name.

-
Query Parameters - Has multiple uses dependent on the specific API implementation. They can be used to filter or sort a specified resource, provide identification, tell the API what format to provide data in and more. The naming convention for query parameters differs from that of path parameters. Query parameter names define which item/field associated with a given resource to do something with, it depends on the implementation of the API in question. A couple of examples:
Here we see we have chosen the name “userId”, this could be because want to be able to filter data coming from the API based on which userId field is associated with it.

-
Graph Payload - Intended to work with APIs that implement GraphQL, an open-source data query and manipulation language. This option is only available if POST HTTP method has been selected since the graph payload is sent in the payload body of a POST request.
The name of a Graph Payload is always the same so the user does not need to set it.
A graph Payload enables definition of the structure of the data required, and the same structure of the data is returned from the server, therefore preventing excessively large amounts of data from being returned. The flexibility and richness of the query language also adds complexity that may not be worthwhile for simple APIs. -
Raw Payload allows the user to define the entire payload sent with the POST requests to the API.
Custom Headers (Optional): The user can add custom headers which like custom parameters will be used when making requests to the target API. This can be any information which the API requires for the user to be able to retrieve data, typically authentication info for access-restricted APIs. Many open APIs do not require authentication. The user is required to learn about which requirements a chosen API has.
Example: Using a custom header to provide the authentication key needed to access a restricted API.

So, now we fill out the fields for our {JSON}Placeholder example:
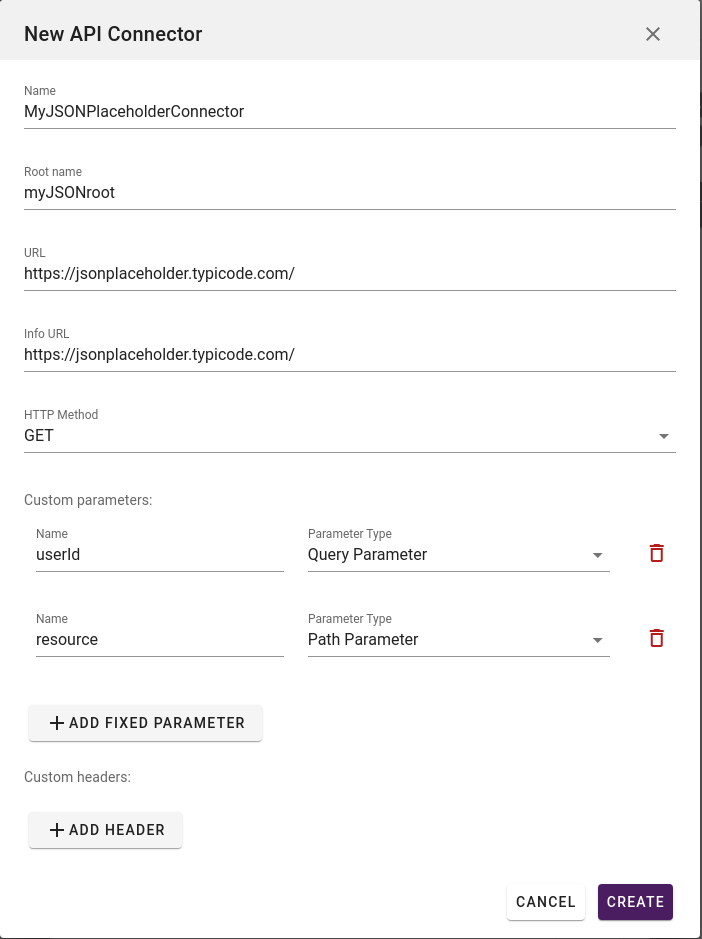
As we can see in the example above, we have chosen a name, the root name myJSONroot, a URL, info URL, HTTP method and 2 custom parameters. We know from reading the documentation about the {JSON}Placeholder API that it needs these 2 parameters to fetch data.
We click “Create” and the system lets us know we have created the API Connector in a popup at the bottom right corner of the window.

¶ Create the API Template
The API Template is where we define what data to fetch from an API and how to process & display it. Using the parameters we set in the API Connector we define exactly what data we want to retrieve, then define the template code that will process and display the data.
Click “Add Template”

This opens the “New Template” window where we see two fields; Name and Source.
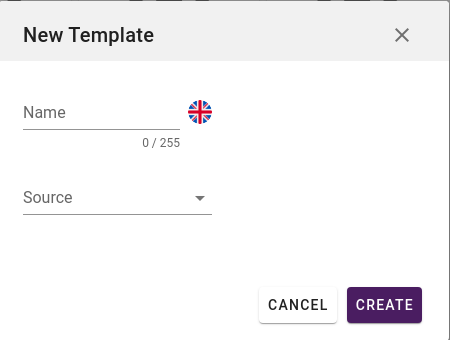
Now name the template, then click the Source drop-down to see a list of all available API Connectors.
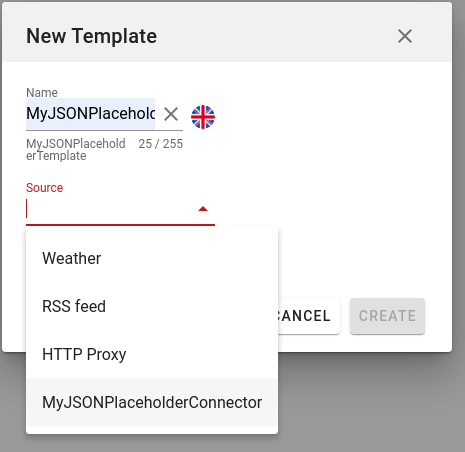
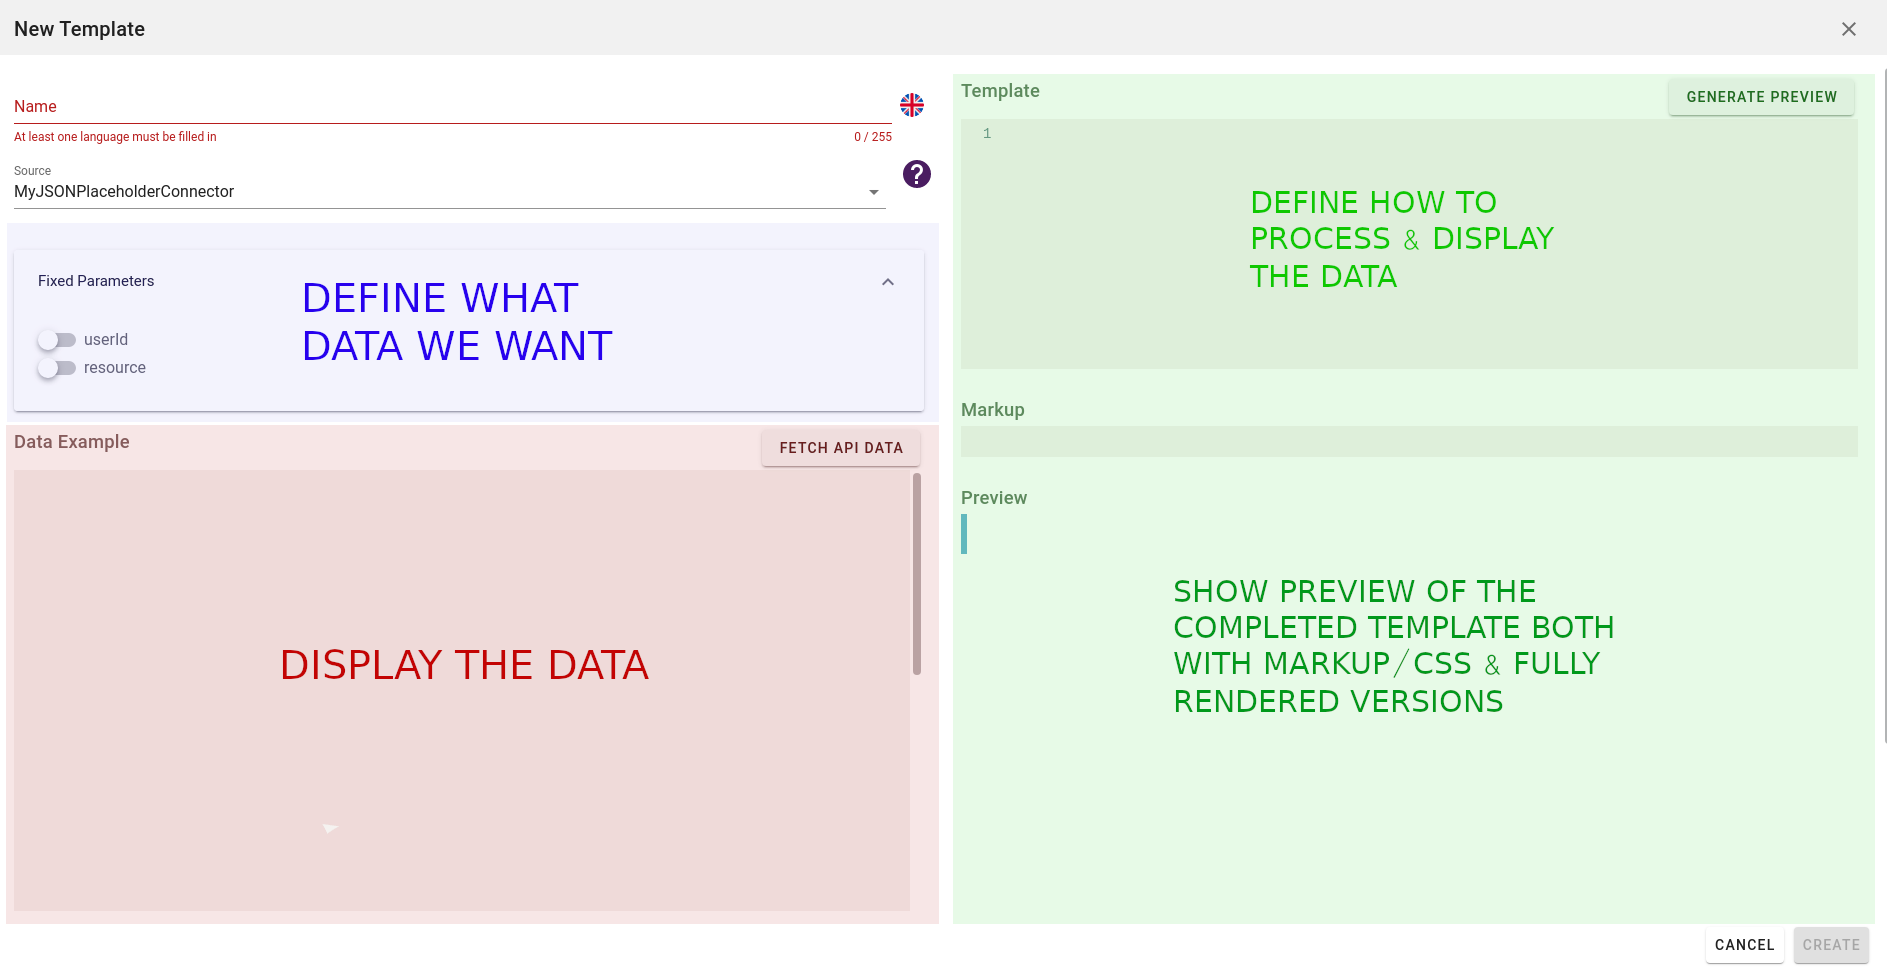
We select our MyJSONPlaceholderConnector and the window expands to reveal 3 more sections: Fixed Parameters (blue), Data Example (red) and API Template (green). Fixed Parameters and Data Example both work together to define what data we want and, after fetching it, display exactly what data we fetched from an API. Seeing exactly how the data is structured we can then in the Template (green) section define how to process and display this data in the Template itself and render a preview of how it will appear when in use.
¶ Fixed Parameters
In the Fixed Parameters (blue) section we can see we have the parameters we set in our MyJSONPlaceholderConnector. When disabled they will not be saved or used by the API Template. When we enable them they will become fixed to the API Template, hence the name Fixed Parameters.

According to the {JSON}Placeholder documentation, it contains multiple resources. In the list below we can see the different resources that the API can provide and the form the path parameter needs to be in to get these resources.
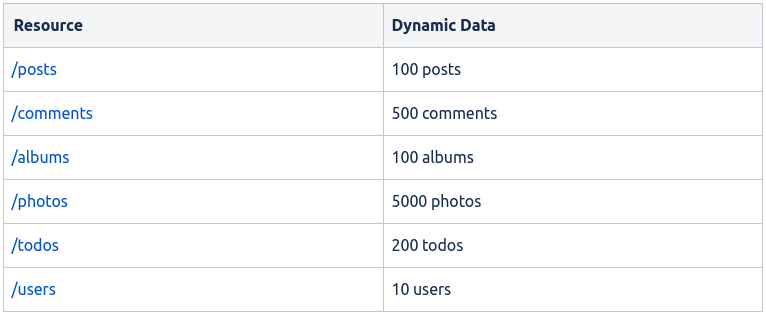
In our example, the API Connector points to the base URL (https://jsonplaceholder.typicode.com) of the {JSON}Placeholder API, therefore by enabling the “resource” parameter we defined in the Connector, we can specify which resource we want to retrieve. We could of course have simply defined the URL in the API Connector complete with resource name, but by instead defining this in the Template we can re-use the API Connector for multiple resources since you can only get one resource at a time.
So now we enable the resource and userId parameters. As seen below we have chosen to specify userId 1 and the resource “posts”. This means that we want to fetch posts made by the user with id = 1. Take note of how since resource is a path parameter, a preview of the complete URL with path parameter is shown.

When we have chosen what data we want, a.k.a set the necessary fixed parameters, we press the “Fetch API Data” button.

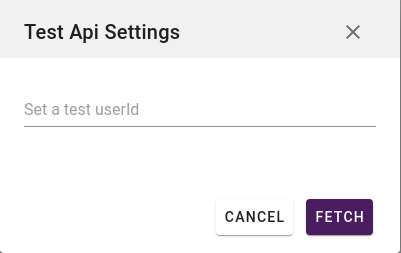
If we have parameters that are not set/fixed when we press the fetch API data button a window will pop up prompting us to set these if we should wish it. The reason behind this is that sometimes it might not be desirable to have these parameters fixed in the template but instead setting them later, so this window gives us a means of testing our parameters. Here we can see we have set the resource but not the userId parameter and the system prompts us about it. Even if we don’t set the userId parameter we can still click the fetch button to test if we receive the data we want.
¶ Data Display
Once the system has made a request to the chosen API, the retrieved data will be shown in the “Data Example” pane.
¶ JSON Data
Below we can see the data returned from the API in JSON format, and we observe that all the data structures are contained in the myJSONroot.
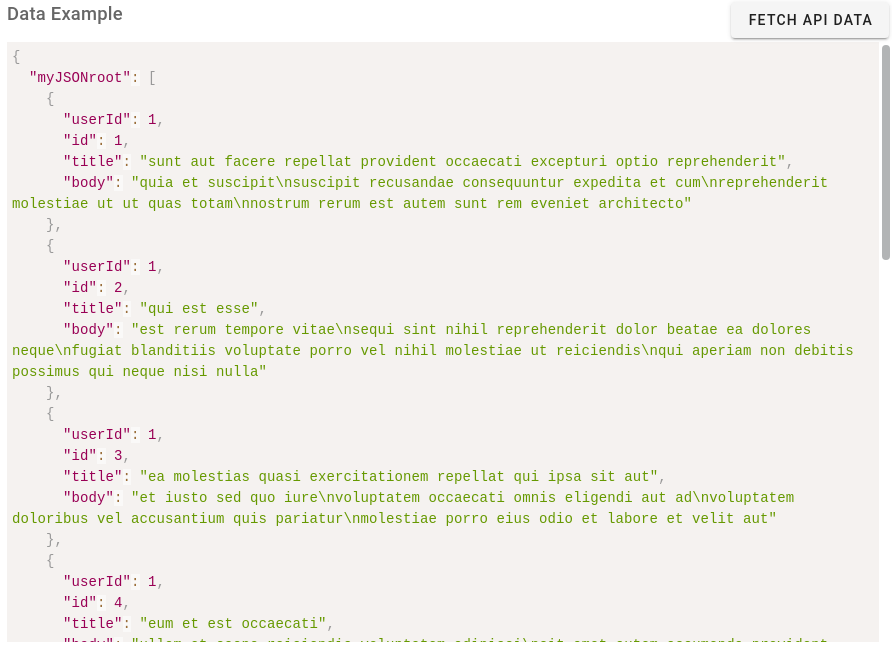
The way the JSON data structure is visually conveyed is as follows:
-
A list (Freemarker: sequence) is indicated by brackets [ ], anything inside these brackets is an item in that list:

-
An item/data container (Freemarker: hash) for data values, is indicated with curly braces { }, anything inside the curly braces is a data value part of that object.
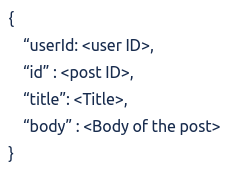
We can observe from this that the data we retrieved from the API was an unnamed list of post data objects and the list received the root name we defined in our MyJSONPlaceholderConnector. If the system did not assign a name to the list retrieved from the API, the Templating engine would have no way of accessing it. We also observe that we only retrieved post objects with userId = 1 as defined in our fixed parameters.
¶ XML Data
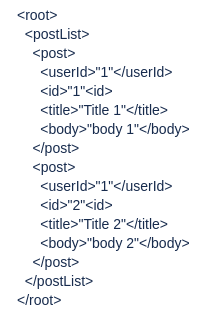
XML is structured fairly similar to JSON, but has some quirks that are important to know. When XML data is retrieved from an API by the API Template, it is inserted under a root name just like JSON data. In the following example, we see the same data we retrieved from the JSONPlaceholder API in the previous section, only now we will structure it in XML form.
As we can see it looks quite a bit different visually, but if we look closer the overall structure remains the same. The postList still contains the two posts from the JSON example, and it’s still arranged under the root name. The different elements of this data structure are called Nodes. The postList node is a child node of the root node, each post is a child node of the postList node and so forth.
¶ Creating the Template Code
So, now that we know the structure of the data we want we can start defining how the API Template will use this data and display it.
The API Template uses a powerful templating engine called FreemarkerTM which allows the user to manipulate and display data through its built in logic system. In addition to this the user is free to employ HTML and CSS to further structure and style the presentation of the processed data.
Further on, we will give some simple examples of how to employ the retrieved API data, but more advanced users should familiarize themselves with FreemarkerTM through its extensive documentation found at: https://freemarker.apache.org/docs/index.html.
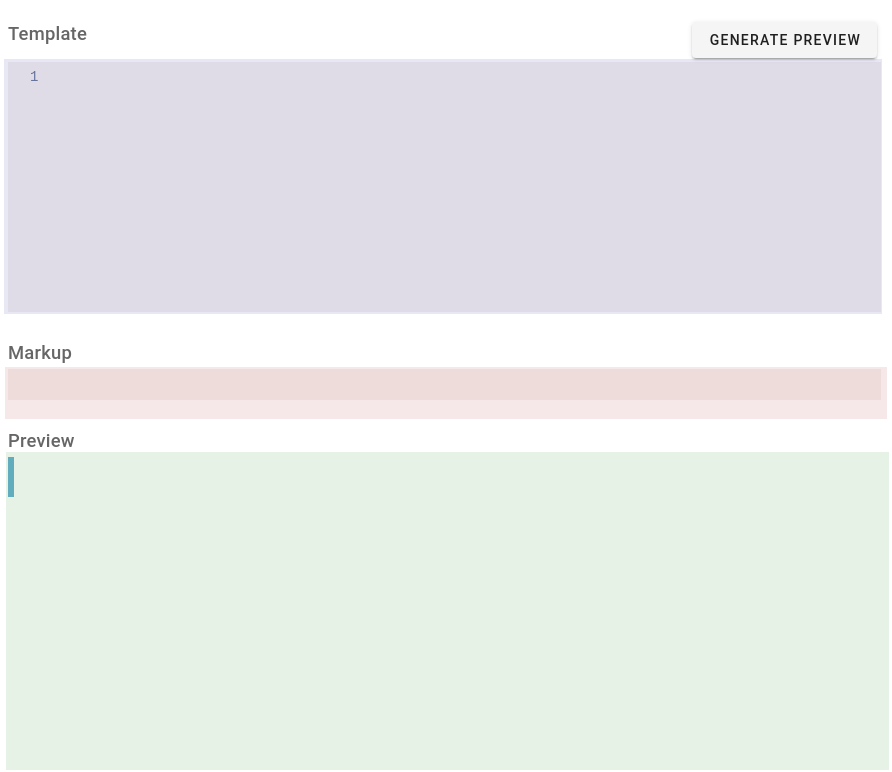
As shown in the illustration below, this section contains:
- “Generate Preview” button
- Template pane (blue) where the user defines the template code.
- Markup preview window (red) showing the processed data and markup code.
- Preview window (green) where the processed data and markup code is fully rendered and shown as it would be when in use.
Freemarker is an advanced templating engine that supports fairly advanced logic statements, however very basic usage is still powerful. The data structures returned from APIs can be a bit confusing, therefore to shed some light on how to use them in a template we will give a few examples below.
Generally data structures consist of:
- Objects/Data Containers / Hashes
- Lists
- Variables - A field within an Object / Data Container that holds some data. This data can itself be an object or a list.
¶ Processing JSON Data
An object consists of a name and its contents, example: “<object name>“: {<Content>}. Everything within the curly braces are variables. In the example below we see the variables are simple strings.
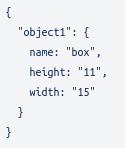
When accessing variables in Freemarker we use the format ${root.variable}, so in this instance it would be ${object1.name}.
We can omit the dollar sign and curly braces when using variables whilst declaring a directive. Directives are denoted by:
<#[directive name]></#[directive name]>.
Now lets take a concrete example based on the data we retrieved from the {JSON}Placeholder API.
Say we retrieved a list of 2 posts and we want to display both these posts and their contents.
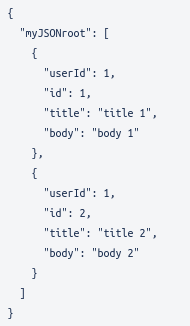
For this purpose, Freemarker has a directive called <#list>, terminated with </#list>, which can be used to iterate through our list of posts.
We can see from the example below that we make use of the myJSONroot list without the use of dollar sign and curly braces as long as it is defined within the first tag of the #list directive.

The <#list> function iterates through each post in the list and displays their title and bodies. We can see that we have defined each post by the name “post” and inside the function this is the name we use to access the variables. In order to access the individual items in a list, we must define this within the <#list> </#list> scope.
Freemarker has many directives that enable us to specify what data to show or process. One of the most important is <#if>.
<#if> allows us to tell Freemarker to process something if it is present, or if some condition is fulfilled or not. Say instead of defining in our Fixed Parameters which posts with a particular user id we want, we instead define this directly in the API Template code.
So, we receive a long list of posts with many different user id’s, and we want only the posts made by the user with ID 5. This is where <#if> comes in. We tell <#if> that if the userId field equals 5 we want to show title and body. Note how we must contain the ${post.title} and ${post.body} within the scope of the <#if>.
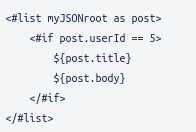
Now the title and body will only show if the condition is fulfilled, but we can also define an alternative with <#else>:
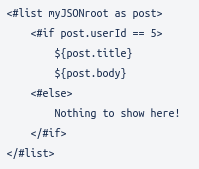
Now the text “Nothing to show here!” will be shown if the condition is not met.
We can further complicate things with <#elseif:
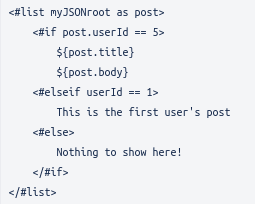
Now we make an additional check to see if the userId is 1. We have chosen to show only a few of Freemarker’s many functionalities in this document. Freemarker has extensive documentation which can be found at https://freemarker.apache.org/docs/index.html and any advanced users are highly encouraged to check it out.
¶ Processing XML Data
The way we go about accessing an XML data structure is a little more involved than JSON data processing. It’s highly recommended that you familiarize yourself with the official documentation regarding XML and Freemarker: https://freemarker.apache.org/docs/xgui_imperative.html
We will go through some simple examples for accessing and processing data using XML. We will be using the data example from the data display section:

We can see that posts are child nodes of the postList node, but we do not call the postList node in order to list out all posts. When there are multiple nodes with the same name, every node with that name count as one single list, and we have to access them as a list.
If we wish to list out the titles of all the posts we write it like so:

Or, if we wish to access both posts directly without listing them we can write:

If there happens to be only a single post node in the data structure it can be accessed like so:

Reserved for instances where we know for certain there is only a single instance of a node.
¶ Attributes
In XML, node elements can have attributes containing values as well as child nodes. Take the following example where the title child nodes of the post nodes have been replaced by title attributes:
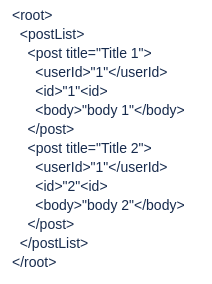
To access the attributes of each post we simply add a @ before the name of the attribute.

¶ Namespaces
One feature of XML is namespaces. These namespaces are meant to provide a method of avoiding element name conflicts by making same-names in different namespaces unique to one another.
An XML namespace is declared using the reserved XML attribute xmlns or xmlns:<somePrefix>, the value of which must be a valid namespace name.
For example, the following declaration maps the "somePrefix:" prefix to the XHTML namespace:

Any element or attribute whose name starts with the prefix "somePrefix:" is considered to be in the XHTML namespace.
It is also possible to declare a default namespace. For example:

Let’s take an example data structure where namespaces are present:
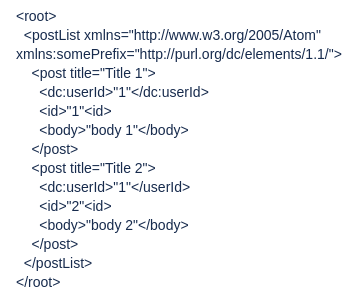
Here we can see that the postList node has defined a default namespace:

And a prefixed namespace:

We can also see that userId nodes have been defined as using the “somePrefix” namespace prefix.
Since this XML data structure has a default namespace as well as a prefixed one registered, we can’t simply access its nodes like usual. We need to register these namespaces for Freemarker to access using the <#ftl> directive.

The ns_prefixes parameter is a way to register namespaces for Freemarker to recognize, and we can register as many as we like. For this particular example we write the namespace registration as follows:
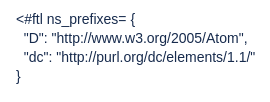
The “D” is a reserved symbol that tells Freemarker that this namespace should be used as the default one when evaluating
templates. Without this registration we wouldn’t be able to access any of the nodes in the structure. We also have to register the
prefixed namespace if we want to access the nodes using this prefix as well.
Now, in order to list each post and write out its contents using our registered namespaces we write the following:
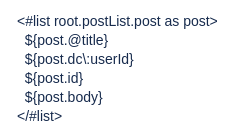
Since every node except <dc:userId></dc:userId> is defined under the default namespace, and we used the reserved “D” symbol to
register it as the default namespace for Freemarker, we don’t need to add anything special in order to access these nodes.
However, <dc:userId></dc:userId> is prefixed with a namespace, therefore we use the following syntax to access it: ${
:}, in this example: ${post.dc:userId}.
¶ Error Handling for the Template Code
If the user defines erroneous template code and clicks the “Generate Preview” button, Freemarker will evaluate the template code and a detailed report on what caused the specific error will be displayed below the Template pane. It will typically tell the user on which line the error occurred and give hints as to what exactly the error was.
In this instance we will attempt to access the list of posts as a regular data object. Since the list is fundamentally different from a data object, Freemarker should return an error.
${myJSONroot.id}
Freemarker tells us that it expected a hash (data object) but found a sequence (list) at line 1.

Here we use the list correctly but there is an error in how we specify to show the user id (userid instead of the case sensitive correct userId).

Freemarker tells us that it tried to access the userid field in the post but failed to find it. Note also how Freemarker gives tips for how to possibly correct the error.
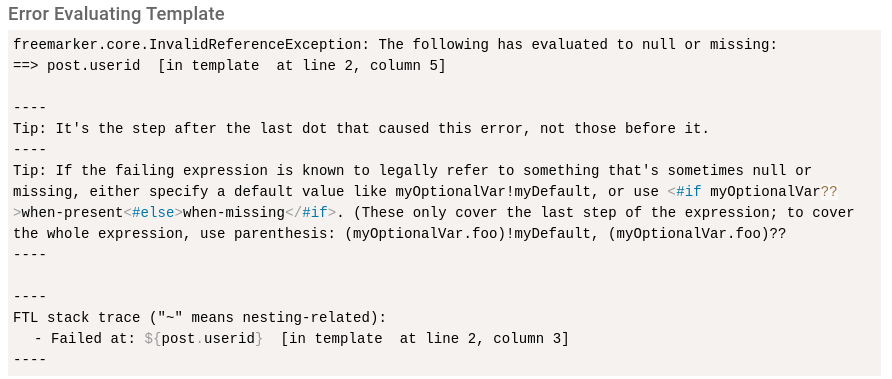
When writing Template code keep in mind it takes only a single error for the API Template to stop functioning, and when encountering an error make sure to read the error message carefully. More detailed info on error handling can be found at: https://freemarker.apache.org/docs/pgui_config_errorhandling.html
¶ Default Error Message field

If the API Template is in use being and contains Freemarker/Templating related errors, a default error message can be defined that will show on the TV/Screen. If no message is defined, the API Template will display as blank.
¶ Available Resources
¶ Weather
We have pre-hosted images for the pre-defined weather connector.
Sizes: 30, 38, 48, 100, 200, 512, 1024
Icon: Using "symbol" from the JSON object given by the service.
URL: https://resources.thecloudportal.com/weather/[size]/[icon].png
Example usage:
Current weather:
<img src="https://resources.thecloudportal.com/weather/200/${forecast.symbol}.png">
<h2>Temperature: ${forecast.temperature}°</h2>
<h2>Rain: ${forecast.precipitation}mm</h2>
¶ Usage
After we have made the API Template we can now use it in a TV Template. Go to Content → TV Templates
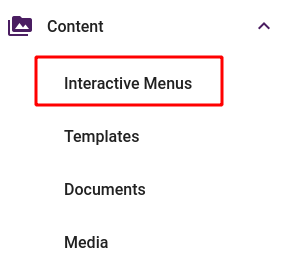
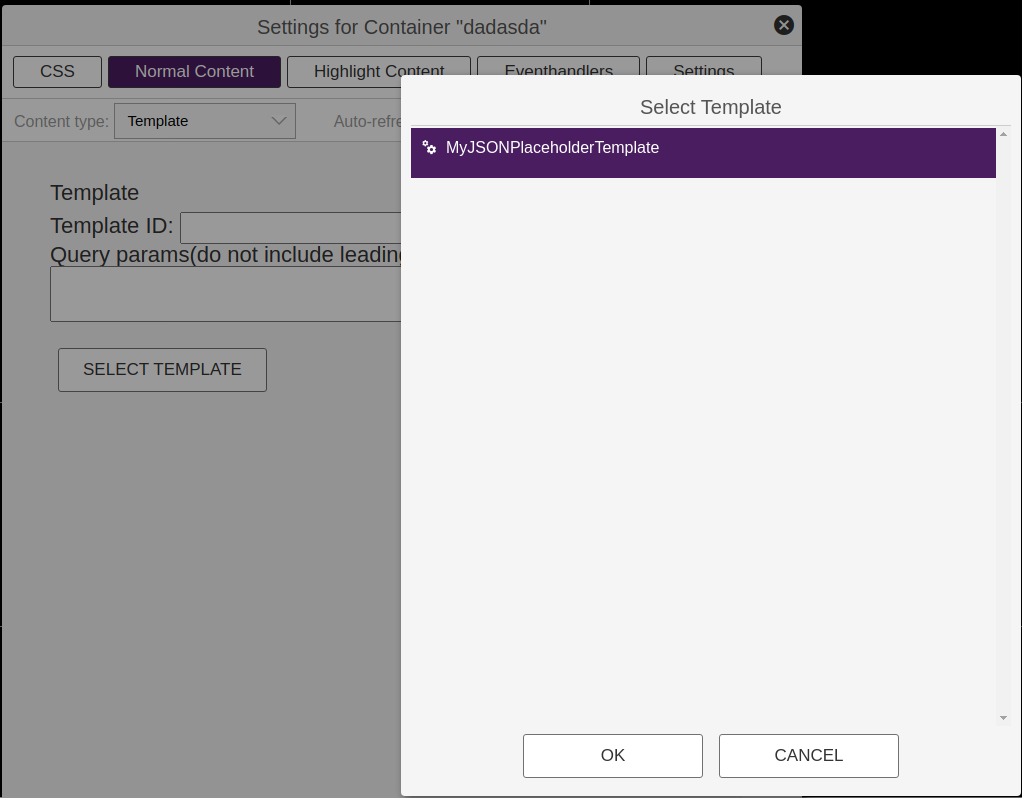
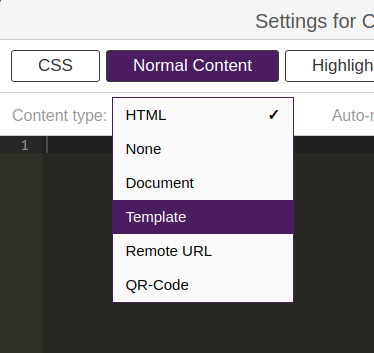
Once on the desired template, create a new container element and edit it, click on the “Normal Content” tab and click “Content Type”, then select “Template”.
Here we see the settings for selecting a Template to use in the container. There can be only one Template per container on the template.
Query Params: This is a special field where you can define the API Connector parameters that were not set to fixed in the Template.
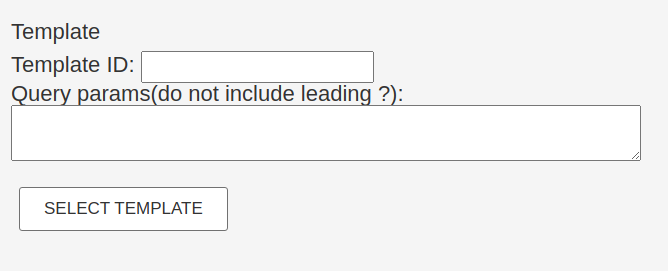
Now we click “Select Template”, then select the MyJSONPlaceholderTemplate template we created in the previous sections.
